


I’ve been camping since before I was old enough to drive myself to a trailhead. Growing up, it meant Coleman lanterns and stumbling around in the dark every time nature called. Later, when I started overlanding seriously, I tried every category of camp light on the market. Rechargeable lanterns, battery-powered string lights, magnetic LED pucks, solar flood panels. None of them solved the core problem. They lit up one small zone and left the rest of camp in shadow. On cold mornings in the field, swapping batteries before coffee is its own misery. What I needed was a proper off grid campsite setup built around a system, not a collection of gadgets.
After months of testing on trips across California the Southwest, I landed on a hardwired 12V approach centered on tricolor LED strips. My off grid campsite setup has worked reliably every trip since. Eventually, the GoFluxx 36″ Tricolor Dimming LED Strip became the anchor of the system. After several months of real-world overland camp lighting use across varied terrain and weather, the light quality is excellent. Specifically, the ease of use is hard to beat. This guide covers the full approach: lighting zones, color modes, power math, and setup sequence, so your camp genuinely functions after dark.
Quick Facts:
- Topic: Off-grid campsite setup for overlanders and truck campers
- Skill level: Beginner to intermediate
- Time to set up: 15 to 30 minutes once gear is installed
- Key gear covered: 12V LED strips, awning lights, power management, color modes
- Featured lighting: GoFluxx 36″ Tricolor Dimming LED Strip, $96 at gofluxx.com
- Power draw (36″ strip): Approximately 1A at full brightness, 0.5A at 50% dim on 12V
- IP rating: IP67 weatherproof and dustproof
- Best for: Overlanders, truck campers, and RTT users on multi-night off-grid trips
9 min read
In This Guide
- Why Most Off-Grid Campsites Fail After Dark
- The Three Lighting Zones Every Camp Needs
- GoFluxx 36″ Tricolor LED Strip: The Workhorse of Camp Lighting
- White, Red, and Amber: Which Mode to Use and When
- Power Management: Running Lights Without Killing Your Battery
- The Camp Setup Sequence Saving Time After Dark
- Pros and Cons of a Hardwired LED Camp System
- Final Verdict
- Frequently Asked Questions
Why Most Off-Grid Campsites Fail After Dark
A functional off grid campsite setup solves two problems most overlanders ignore until they are already tired and frustrated: coverage and control. Coverage means enough light across the cooking area, the tailgate, the awning, and the path between them. Control means adjusting brightness and color for the task at hand. Without both, you end up blinding yourself or attracting every moth within a quarter mile.
Most campers treat lighting as an afterthought. They toss a lantern in the kit and assume it is enough. On a weekend car camping trip with a picnic table, a lantern works fine. However, on a three-day dispersed camping trip where your truck is your kitchen and bedroom, a single lantern leaves half the camp in darkness. It also runs flat by the second night. The campsite lighting setup for serious overlanders has to be permanent, low-draw, and layered across at least three distinct zones.
Overland camp lighting also has an etiquette dimension, especially for overlanders finding free dispersed campsites on public land. A good off grid campsite setup respects neighbors as well as terrain. A 2,000-lumen work light aimed at your cook station spills into neighboring sites and ruins everyone’s night vision. In contrast, a well-designed system using dimmed warm or amber tones keeps your camp functional without turning the trailhead into a parking lot.
The Three Lighting Zones Every Camp Needs
Before selecting any specific gear, map your off grid campsite setup into three functional zones. Each zone has different brightness and color requirements. Trying to cover all three with one light source is why most setups consistently fall short.
Zone 1: The Awning and Living Area
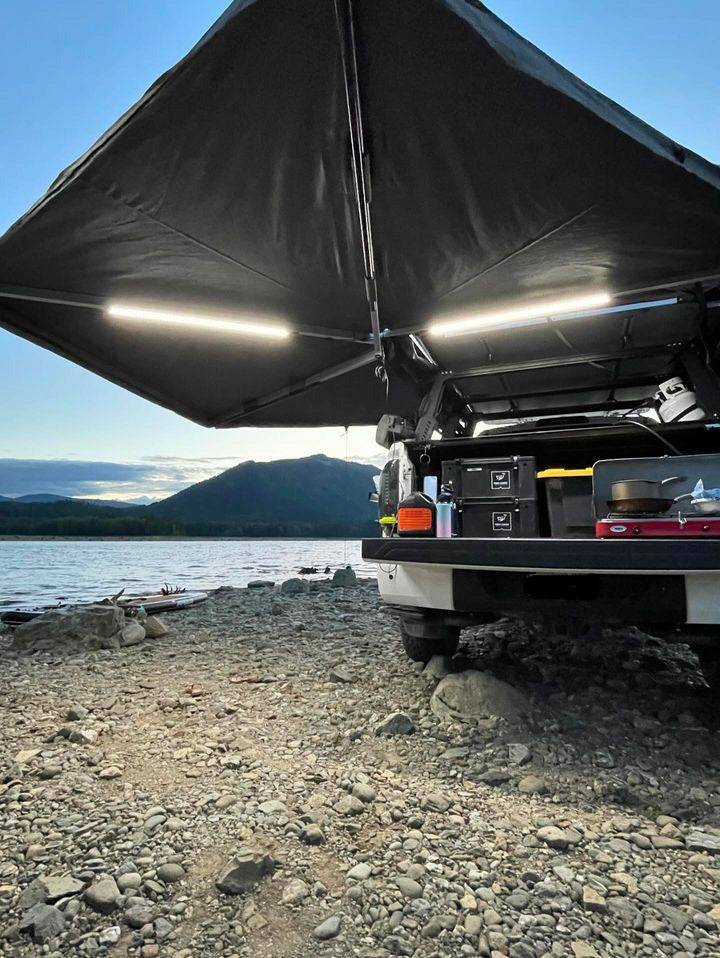
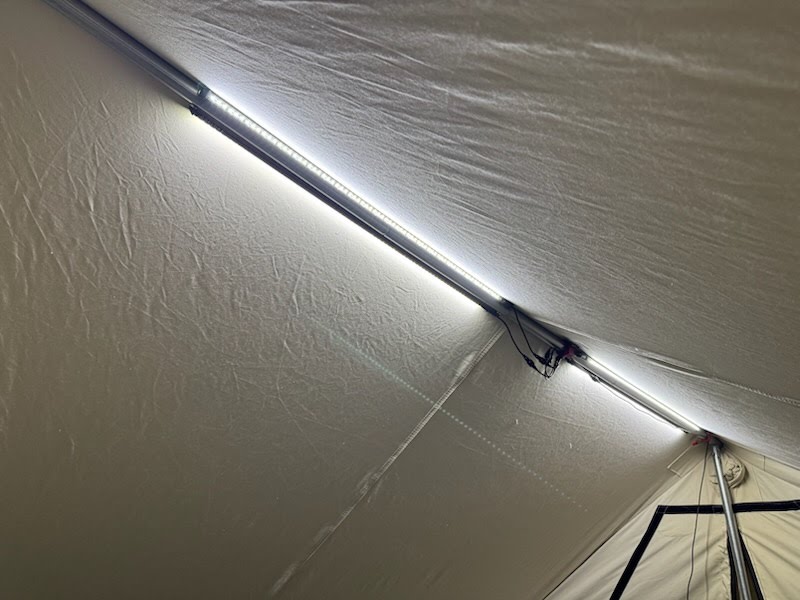
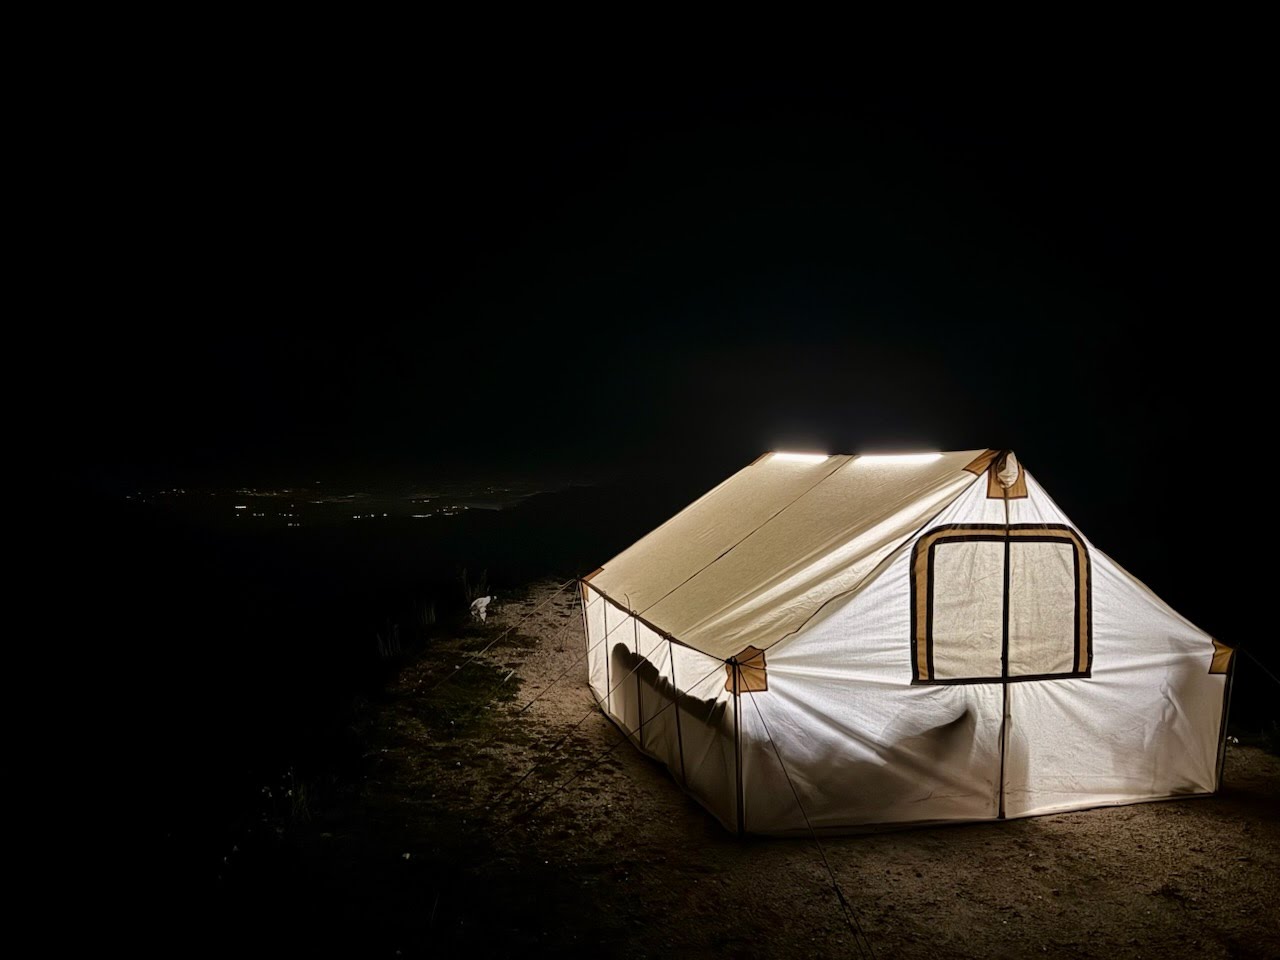
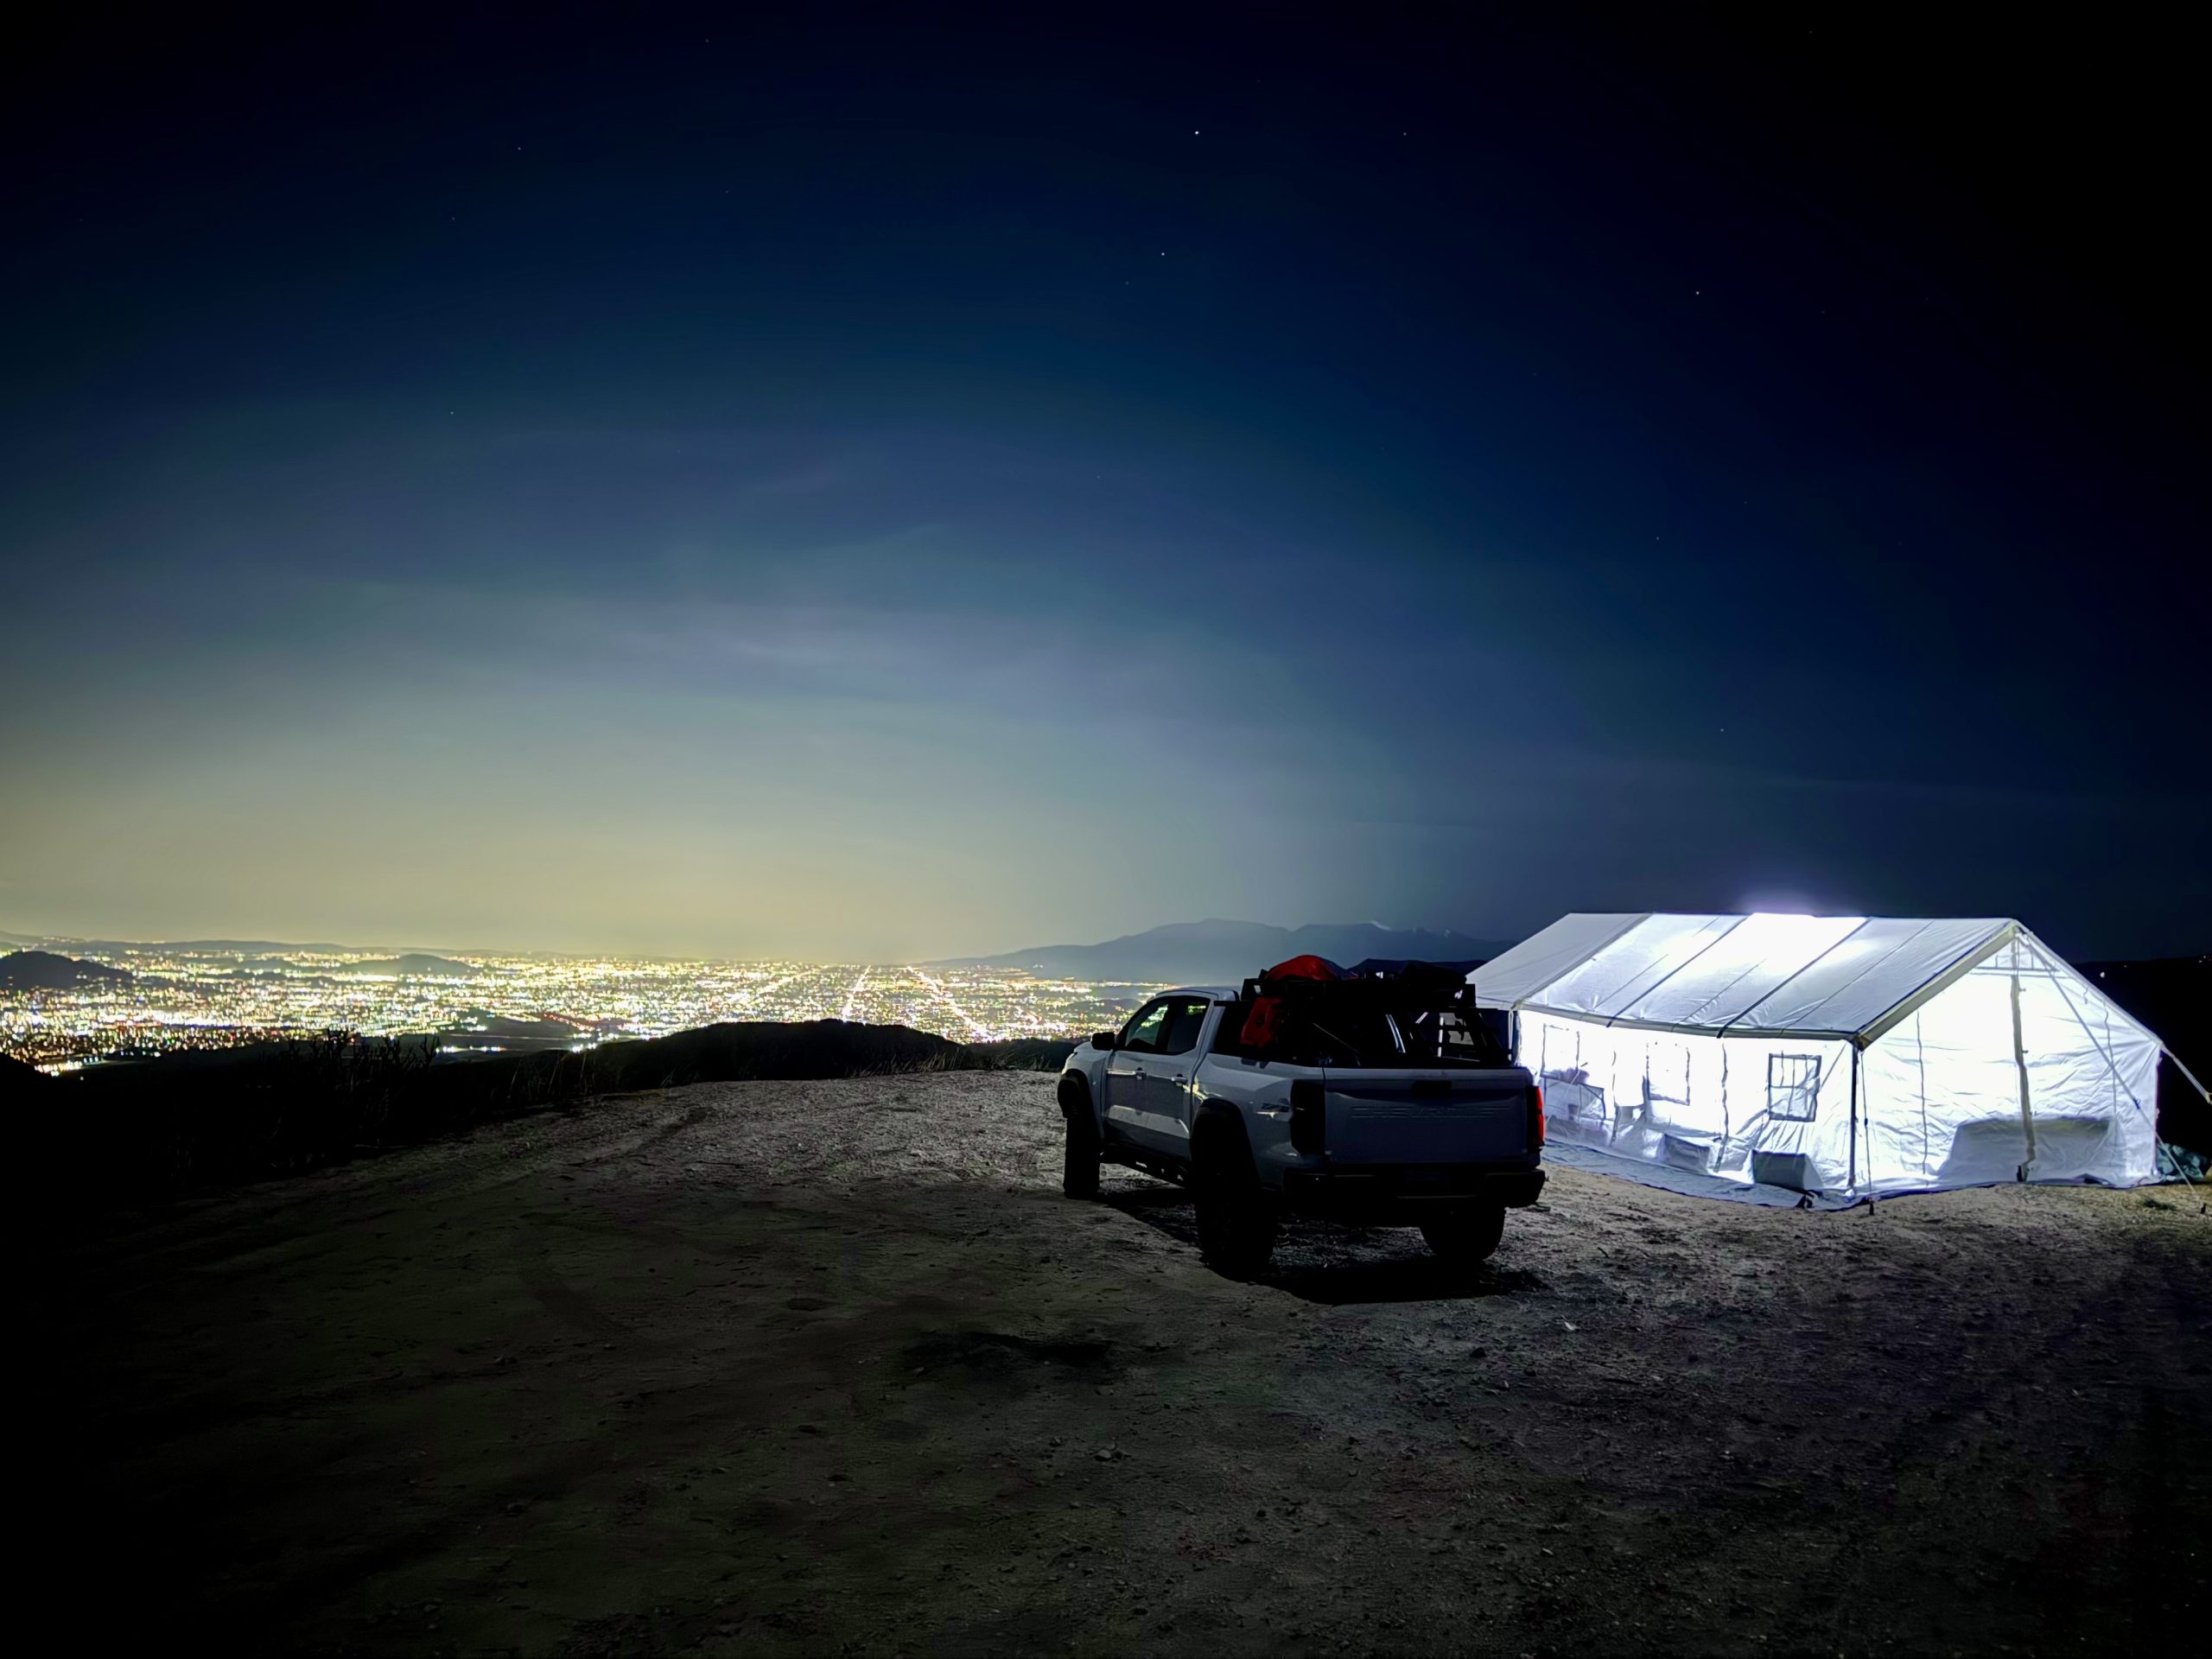
This is your primary social space: where you eat, sit, and talk. It needs diffused, dimmable ambient light across a wide area, typically 8 to 12 feet. Harsh point sources create shadows making it hard to see food, gear labels, or the person sitting across from you. Instead, a tricolor LED strip mounted along the length of your awning rail delivers even overhead illumination without hot spots. At 50% dimming, a 36″ strip draws about 0.5A at 12V. For a basic campsite lighting setup, this zone is where most overlanders should start.
Zone 2: The Tailgate and Kitchen
Cooking requires brighter, higher-CRI white light so you see what you are cutting and whether meat is cooked through. This zone benefits from a strip mounted inside the tailgate or along the top of a bed rack. Aim it straight down onto your work surface for maximum task coverage. White mode at full brightness works well here. Because this zone runs for only 30 to 60 minutes during meal prep and cleanup, its total power draw is short-duration and rarely a budget concern.
Zone 3: The Tent or Sleeping Area
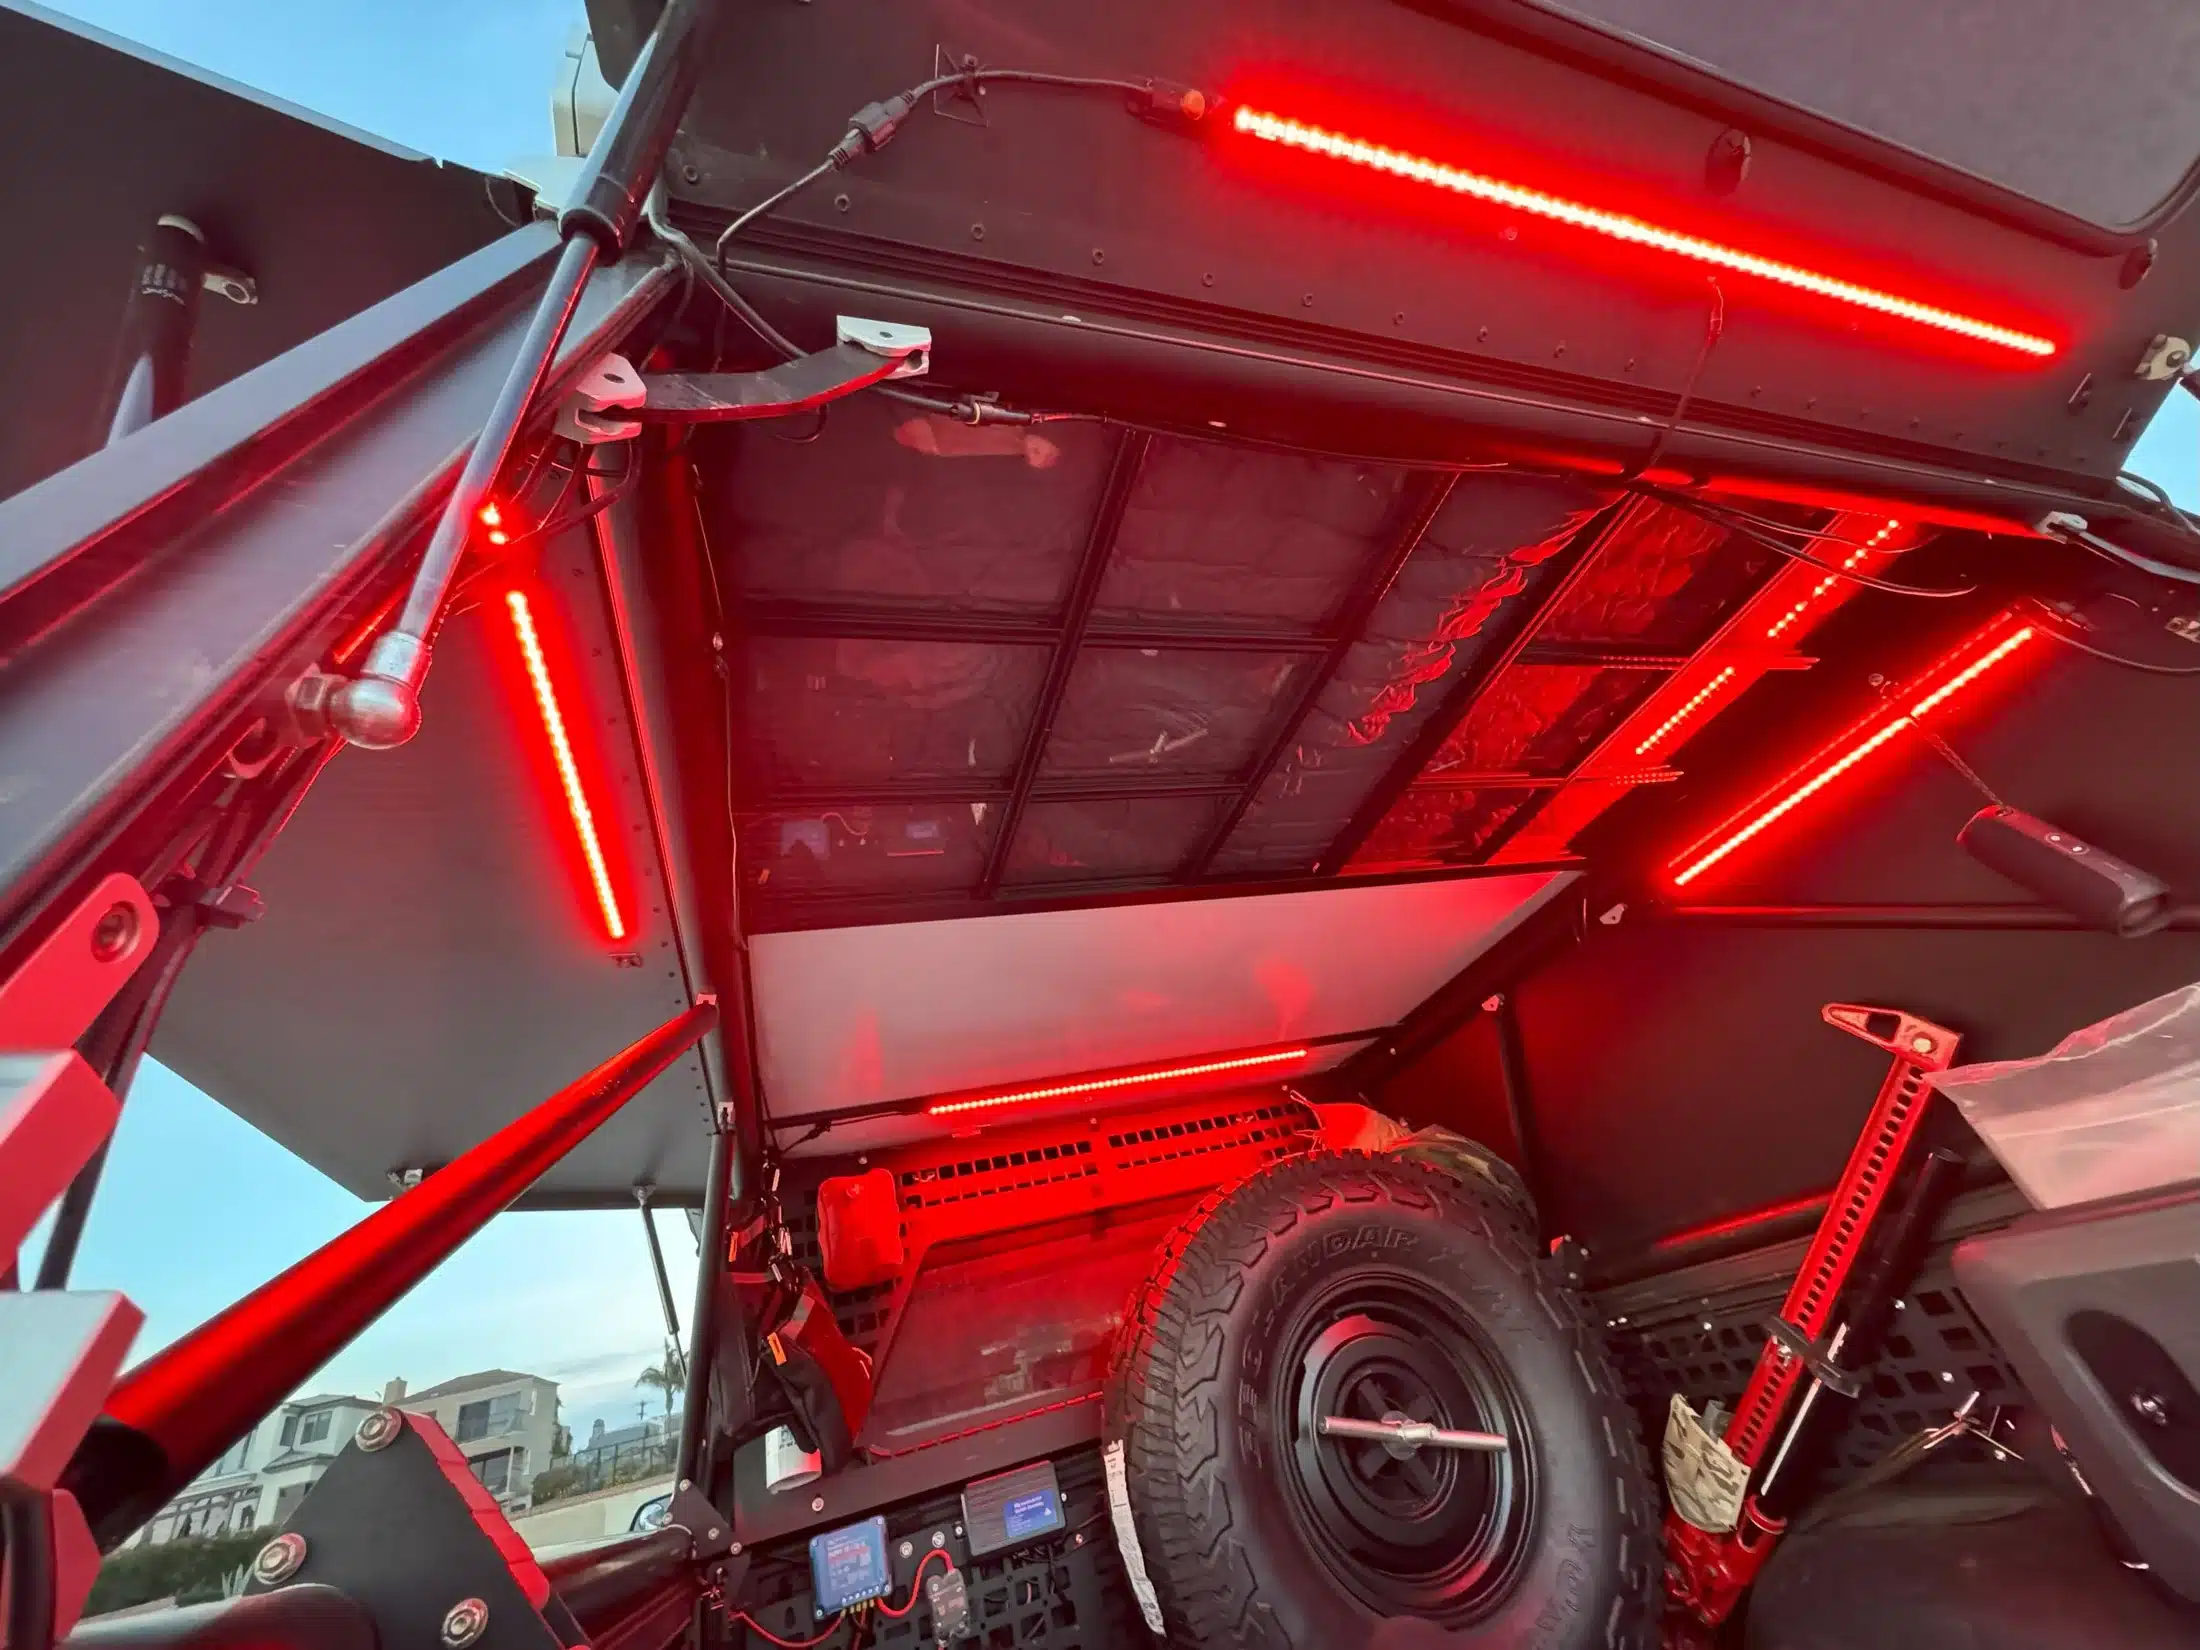
Interior lighting for rooftop tents and campers needs to be soft, low-output, and red or amber to avoid disrupting sleep. A 24″ or 36″ strip mounted inside the tent shell gives enough light to read or organize gear. It also lets you find your headlamp without waking your camp partner. Red light has an additional field advantage: it preserves dark-adapted vision, so stepping outside after time inside the lit tent does not leave you temporarily blind.
GoFluxx 36″ Tricolor LED Strip: The Workhorse of Camp Lighting
The GoFluxx 36″ Tricolor Dimming LED Strip ($96 at gofluxx.com) is the piece of kit anchoring a complete off grid campsite setup. It runs on 12VDC and pulls roughly 1A at full brightness. The strip carries an IP67 weatherproof and dustproof rating. It ships in a black anodized aluminum housing with 3M foam-backed adhesive and built-in mounting lugs. Aluminum dissipates heat far better than the plastic housing on most budget strips, which extends LED lifespan significantly across years of use.
Buy Direct From GoFluxx
GoFluxx 36″ Tricolor Dimming LED Strip
IP67-rated, 12V hardwired, white/red/amber modes with built-in dimming. Ships with 3M adhesive and mounting lugs for permanent installs.
The tricolor system covers white, red, and amber modes, handling every camp scenario with a single strip. The mode cycles at the integrated switch button on the housing. Crucially, the strip remembers its last mode when power is restored. Switch it off in red mode for sleeping, flip it back on in the morning, and it returns to red rather than a blinding white at 6 AM. On cold mornings in the field, memory mode is a feature you notice immediately.
Also, multiple strips connect through GoFluxx splitters, letting you run two or three zones off one 12V power cord. One switched circuit controls your awning strip, tailgate strip, and tent interior strip simultaneously. For the full product breakdown, including pod lights and awning kits, see the full GoFluxx lighting review.
| Specification | Details |
|---|---|
| Length | 36 inches (approx. 90cm) |
| Voltage | 12VDC |
| Color modes | White, Red, Amber (tricolor) |
| IP rating | IP67 (weatherproof, dustproof) |
| Housing | Black anodized extruded aluminum |
| Mounting | 3M foam-backed adhesive + mounting lugs |
| Dimming | Integrated at switch; compatible with Redarc current control |
| Mode memory | Saves last-used mode on power cycle |
| Approx. current draw | 1A at full brightness / 0.5A at 50% dim |
| Price | $96 at gofluxx.com |
White, Red, and Amber: Which Mode to Use and When
The three color modes on the GoFluxx strip are not a gimmick. Each one solves a different scenario in your off grid campsite setup. Understanding the practical difference between modes saves battery, reduces eye strain, and keeps neighbors from complaining about light bleed.
White Mode: Task Lighting and Setup
White light delivers the highest output and the most accurate color rendering. Use it while cooking, reading maps, or inspecting gear for damage. Specifically, any task where color accuracy and full brightness matter benefits from white mode. At full output, a single 36″ strip produces enough light to work comfortably at a tailgate kitchen. The trade-off is white light attracts insects and disrupts dark-adapted vision within a few minutes of exposure. For this reason, white mode works best in short bursts during active tasks rather than as an all-night ambient setting.
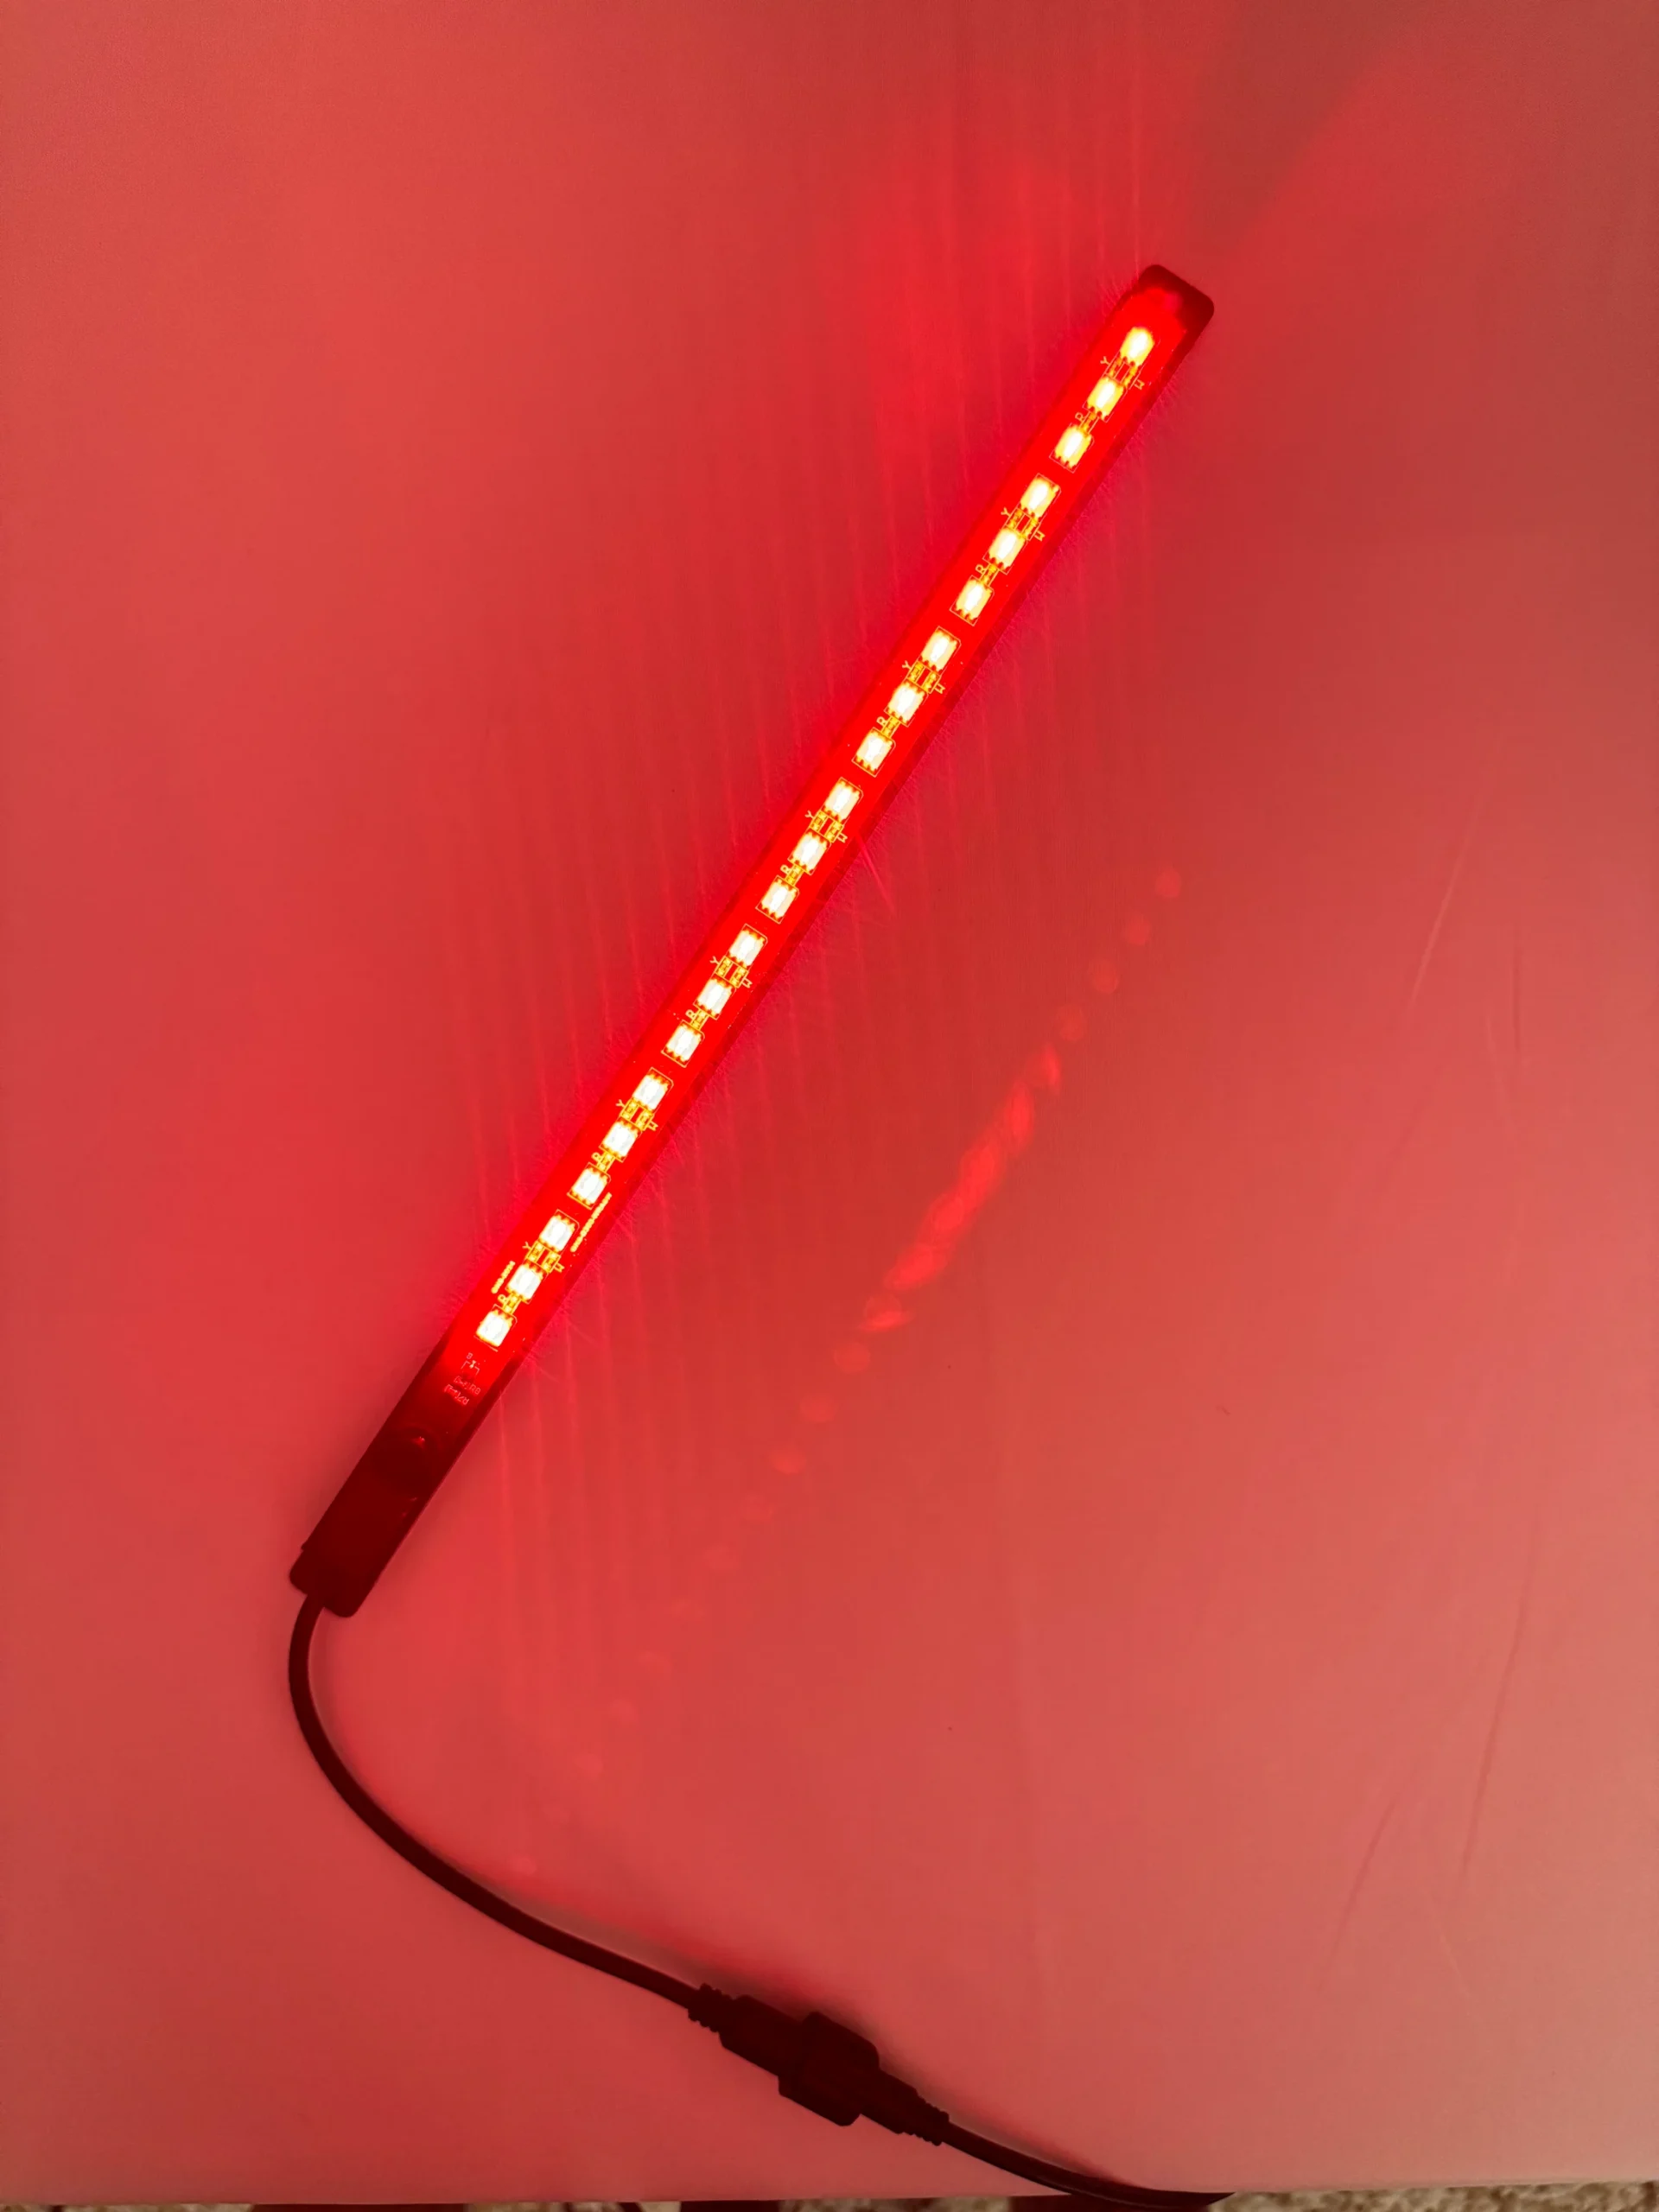
Red Mode: Night Vision and Sleep
Red light does not trigger the photoreceptors responsible for dark adaptation in human eyes. As a result, spending time under red light at camp allows your eyes to remain partially adapted to darkness. When you step outside after sitting under red light, your low-light vision is significantly better than it would be after the same time under white light. The military has relied on this principle for decades, and overlanders operating on backcountry trails benefit from it equally. Switch to red mode after dinner and keep it there through lights-out.
Amber Mode: Ambient Glow and Bug Reduction
Amber sits between white and red in terms of brightness and warmth. It produces a soft, pleasant glow well-suited to evening relaxation. Specifically, it is bright enough to see food and faces across the camp table, while warm enough to feel comfortable rather than clinical. Amber also attracts far fewer insects than white light, making it the practical choice for warm-weather trips where bugs are a consistent issue. Knowing which mode to use is only half the equation. The other half is making sure your battery system supports the full night without running short.
Power Management: Running Lights Without Killing Your Battery
The most common mistake in any off grid campsite setup is skipping the power math. Overlanders obsess over battery capacity for fridges and phone charging but often plug in 12V LED strip lights without checking the draw first. A 36″ GoFluxx strip pulls about 1A at full brightness. Running three strips at full white for eight hours pulls roughly 24Ah from your auxiliary battery. On a 100Ah lithium battery, that’s 24% of capacity, well within a safe margin. On a 50Ah AGM battery shared with a fridge, the same draw starts competing for headroom.
The practical solution is dimming. Dropping a strip to 50% brightness cuts draw to approximately 0.5A. Consequently, three strips at 50% for eight hours pull only 12Ah total, a comfortable load even on modest battery setups. For a full breakdown of how to build a lighting budget around your battery system, the campsite lighting specs guide covers those numbers in depth.
Wiring Tips for a Clean 12V Install
GoFluxx strips wire directly to 12V. The 10-foot power cord with a 12V plug runs from your power source to the first strip, and additional strips daisy-chain through splitters. For a permanent off grid campsite setup, bypass the 12V plug and hard-wire directly to your auxiliary battery through an inline fuse. A 5A blade fuse covers a three-strip system comfortably. Route wiring through existing grommets or conduit to keep the install clean and protect against chafe. A simple toggle switch mounted inside the cab lets you kill all lights without going outside, which is worth building in from the start.
Save on Camp Lighting
Build Your GoFluxx System at gofluxx.com
Splitters, extension cords, and power switches let you run multiple zones from one circuit. Start with one strip and expand without rewiring.
The Camp Setup Sequence Saving Time After Dark
Arriving at a campsite after dark with no system in place means fumbling with headlamps and tripping over gear. You spend the first 20 minutes of your night frustrated rather than settled. The first time I pulled into a BLM site in the Book Cliffs after dark with this system fully installed, the whole camp was lit in under two minutes. A fixed lighting system eliminates most of the friction, but the sequence in which you deploy it also matters. After testing this on dozens of off-grid nights, the following order works consistently for a complete off grid campsite setup.
First, deploy your awning before anything else. The awning strip comes on immediately when you flip the main switch, giving you overhead light across the full camp area. Second, open the tailgate and switch the tailgate strip to white mode to begin prep work. Third, open your RTT or camper and switch the interior strip to red mode so it’s ready when you turn in. Finally, once cooking is done and you’ve transitioned to the evening, drop the awning strip to 50% amber. From there, camp runs on low power and low intensity until lights-out.
The whole sequence takes less than two minutes once the gear is installed. Most overlanders spend 10 to 15 minutes positioning lanterns, running extension cords, or deciding where to hang a light. A permanent zone-based system eliminates the guesswork.
Pros and Cons of a Hardwired LED Camp System
Pros
- Always ready with no batteries to swap or charge before a trip
- IP67 rating handles rain, dust, and stream crossings without failure
- Approximately 1A draw at full brightness leaves ample headroom on any dual-battery setup
- Tricolor modes (white/red/amber) cover every camp task with a single strip
- Mode memory prevents accidental white-light wake-ups after sleeping in red mode
- Splitter system lets you add zones without rewiring the entire circuit
- Aluminum housing dissipates heat for longer LED lifespan compared to plastic-housed strips
Cons
- Requires a 12V power source, so it is not plug-and-play for campers without aux power
- Installation takes 1 to 2 hours and basic wiring knowledge for a permanent hard-wire job
- At $96 per 36″ strip, the price is higher than budget LED alternatives
- Not portable, so strips do not travel to a fire pit or remote area away from the rig
- Splitter cables add minor cable management complexity in tight installs
Final Verdict
A solid off grid campsite setup after dark comes down to three decisions: where to put light, what color to use for each task, and how to power it without budget anxiety. Zone-based coverage solves the first. Tricolor mode selection solves the second. A hardwired 12V circuit drawing 0.5 to 1A per strip solves the third. The GoFluxx 36″ Tricolor Dimming LED Strip handles every zone with the same hardware, keeping the system simple and expandable as your rig grows.
After several months of real use across varied terrain and weather, the light quality from the GoFluxx strips holds up in ways budget strips do not. Output is even with no flicker or hot spots. Also, there have been zero weather-related failures despite rain, dust, and cold nights. Overlanders spending more than a few nights per year off-grid will recover the cost difference over a single season. Budget strips commonly delaminate or fail in wet conditions; the GoFluxx aluminum housing resists both.
For overlanders building a camp lighting system for the first time, starting with one 36″ strip under the awning is a low-risk entry point at $96. Add a tailgate strip for cooking coverage and a shorter strip inside the tent for sleep-mode red light. At three strips on a single fused circuit, the full off grid campsite setup draws under 2A total at 50% dimming. On any dual-battery rig, that’s a negligible overnight load.
Camp lighting is one of the highest-impact, lowest-complexity upgrades available for an overland rig. A single GoFluxx strip under the awning transforms a frustrating after-dark camp into a functional, comfortable space. Two strips cover a full off grid campsite setup. Three strips cover every scenario on a multi-night trip, and the GoFluxx system is built to handle all of them.
Ready to Buy?
Shop the GoFluxx 36″ Tricolor Strip
$96 direct from GoFluxx. Ships with power cord, 3M adhesive, and mounting lugs. Splitters and extension cords available to build a full multi-zone camp system.
Frequently Asked Questions
How do you light up an off-grid campsite without shore power?
A 12V hardwired LED system powered by an auxiliary battery is the most reliable off grid campsite setup for overlanders. Tricolor LED strips drawing 0.5 to 1A each run for 8 to 12 hours on a 100Ah lithium battery without meaningfully affecting battery reserve. A solar panel topping off the aux battery during the day keeps the system self-sustaining on multi-night trips.
What is the best LED strip light for overlanding?
The GoFluxx 36″ Tricolor Dimming LED Strip is a strong choice for overland camp lighting. It combines IP67 weatherproofing, anodized aluminum housing, and three color modes in one unit. The mode memory function and splitter compatibility make it practical for multi-zone setups. At $96, it costs more than budget strips, but the durability across multiple seasons justifies the price for regular overlanders.
How many lumens do you need to light a campsite?
For ambient awning light, target 300 to 600 lumens spread evenly across a 10-foot area. Task lighting at the tailgate kitchen benefits from 500 to 1,000 lumens. Interior tent lighting needs only 100 to 200 lumens. Higher output is not always better: a 2,000-lumen point source creates harsh shadows and attracts insects, while a diffused 400-lumen strip covers the same area more effectively.
Does red light preserve night vision at camp?
Yes. Red light at wavelengths around 620 to 750 nanometers does not activate the rod photoreceptors responsible for scotopic, or dark-adapted, vision. Spending 20 to 30 minutes under red light during off-grid camping at night leaves your eyes substantially more adapted to darkness than the same time under white light. This matters when you leave camp to navigate a trail, use a restroom, or do anything requiring low-light vision outside the lit zone.
How long will a 12V LED strip run on a battery?
A single GoFluxx 36″ strip drawing 1A at full brightness runs for 100 hours on a 100Ah lithium battery if it were the only load. In a realistic overlanding setup with a fridge and accessories, expect 10 to 20 usable hours per charge cycle. At 50% dimming with 0.5A draw, runtime doubles. Three strips at 50% brightness draw only 1.5A total, a manageable load on most dual-battery overland setups across multiple nights between solar recharge.
Do I need a permanent install, or will a 12V plug work?
GoFluxx sells a 10-foot power cord with a standard 12V plug so you connect directly to a cigarette lighter outlet. This approach works well for testing placement before committing to a permanent install. For regular use on multi-night off-grid camping trips, hard-wiring through an inline fuse delivers a cleaner install and eliminates the risk of a loose plug dropping power mid-trip.
Heads up: Clicking on our affiliate links and exploring our sponsored content helps us at no extra cost to you, and we only recommend gear we’re absolutely crazy about!