


Quick Verdict: A safe water crossing starts before you reach the water. Check the depth on foot, know your vehicle’s safe depth (30 inches for the Gladiator Rubicon, roughly 20 inches for the Colorado ZR2), select 4-Low 2nd gear, and maintain a steady bow wave. I’ve crossed dozens of creeks and trail fords across Colorado and California in both vehicles and the technique is consistent: preparation prevents damage, and rushing causes hydro-lock. This guide covers everything from pre-crossing assessment to post-crossing maintenance.
Last updated: March 2026 | 11 min read
In This Guide
- Why Water Crossings Are the Highest-Risk Off-Road Maneuver
- Pre-Crossing Assessment: Walk Before You Drive
- Water Fording Depth: Know Your Vehicle’s Limits
- Vehicle Preparation Before the Water
- Driving Technique: The Bow Wave Method
- Hydro-Lock Prevention: Protecting Your Engine
- Stuck Mid-Crossing: What to Do
- Post-Crossing Maintenance Checklist
- Pros and Cons of Water Crossings in a 4WD
- Final Verdict
- Frequently Asked Questions
Why Water Crossings Are the Highest-Risk Off-Road Maneuver
A single bad water crossing costs more than a full season of rock crawling. Hydro-lock runs $3,000-$8,000 in engine repairs. Water-contaminated differentials need $500-$1,000 in fluid changes and seal replacement. Electrical gremlins from submerged connectors persist for months. The reason this off-road obstacle carries more risk than any other: water hides the bottom. You cannot see holes, submerged rocks, or sudden depth changes until your vehicle drops into them.
Because of these costs, every experienced off-roader treats fords with more caution than any other obstacle. Water enters places on your vehicle where it causes the most expensive damage: the engine air intake, differential housings, electrical connectors, and wheel bearings. For a thorough overview of preparation steps, see our guide to preparing your 4WD for river crossings.
Pre-Crossing Assessment: Walk Before You Drive
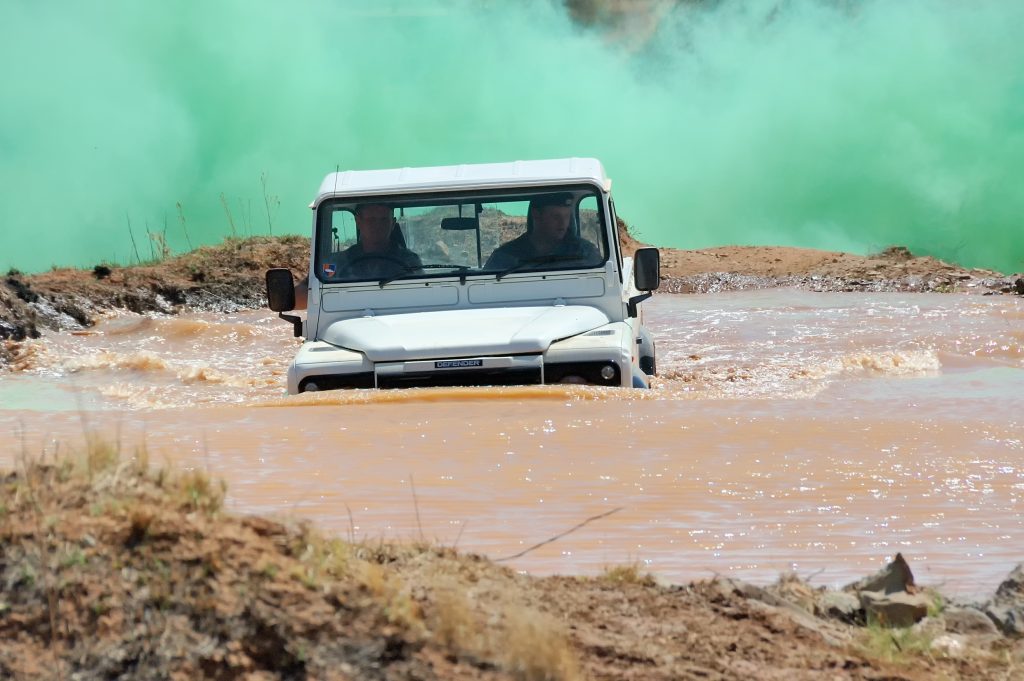
Never drive into water you have not walked first. Consequently, this rule has no exceptions. Before every ford, get out of your vehicle and physically wade through the crossing path. Bring a stick or trekking pole to probe the bottom. You are checking for three things: depth, bottom firmness, and current strength.
Depth: Mark the water level against your leg or the stick. Compare the deepest point to your vehicle’s published safe depth. If the water reaches your mid-thigh (roughly 24-30 inches), most stock trucks handle the crossing safely. Above this depth, you need modified breathers or a snorkel.
Bottom firmness: Push your stick into the substrate. For example, gravel or rocky bottoms provide reliable traction. Soft mud or silt creates suction and increases the risk of getting stuck mid-stream. If your boots sink more than 4-6 inches, rethink the crossing or find an alternate line.
Current strength: Flowing water above your knees at any noticeable speed generates enough force to push a truck sideways. If you struggle to stand in the current, your vehicle will struggle to maintain a straight line. River current at 6 mph exerts roughly the same lateral force as a 60 mph wind. Instead, choose a wider, shallower section when the current is strong.
Water Fording Depth: Know Your Vehicle’s Limits
Every 4WD vehicle has a maximum water fording depth published by the manufacturer. Specifically, this number reflects the height at which water reaches critical components (air intake, ECU, fuse box). Exceeding it risks hydro-lock and electrical failure.
| Vehicle | Factory Fording Depth | Notes |
|---|---|---|
| Jeep Gladiator Rubicon | 30 inches | With standard air intake; higher with aftermarket snorkel |
| Jeep Wrangler Rubicon | 33.6 inches | Highest factory fording depth in its class |
| 2025 Chevy Colorado ZR2 | ~20 inches (estimated) | GM does not publish official fording depth; air intake limits |
| Toyota Tacoma TRD Pro | ~24 inches (estimated) | Based on air intake position; snorkel available |
| Ford Bronco (Sasquatch) | 33.5 inches | With optional snorkel available from factory |
| Toyota 4Runner TRD Pro | ~25 inches (estimated) | Higher ground clearance than Tacoma; aftermarket snorkel common |
On my Gladiator, I stay below 24 inches whenever possible, even though the factory rating is 30. The published number is a maximum, not a target. Water splashing, uneven bottoms, and hidden drops mean real conditions rarely match the controlled testing environment. Similarly, the ZR2 has no published depth rating from GM, so I keep crossings below 16 inches to protect the lower-mounted air intake. To understand how your vehicle’s snorkel raises the safe fording limit, see our detailed explanation.
Featured on MORRFlate
Air Down Before the Crossing. Air Up After. Do Both in Under 5 Minutes.
Lower tire pressure improves traction on slippery river bottoms. The MORRFlate TenSix deflates and inflates all four tires simultaneously, so you spend less time at the water’s edge.
Vehicle Preparation Before the Water
Before entering any ford, run through this preparation checklist. Each step takes under a minute and prevents the most common forms of water damage.
Engage 4-Low: Select 4L before entering the water. Because low range gives you maximum torque at minimum speed, which is exactly what you need for maintaining steady momentum through resistance. Never shift between modes while in the water.
Reduce tire pressure: Drop to 20-25 PSI for river bottoms with rocks or gravel. Softer tires increase traction on slippery surfaces and reduce the chance of losing grip mid-stream. Additionally, softer tires conform to submerged rocks better than fully inflated ones. For the science behind this, check our tire pressure and traction guide.
Roll down windows and unbuckle seatbelts: In the rare case a ford goes badly wrong and the vehicle begins to float or tip, you need to exit quickly. This is a safety step, not a driving technique. Specifically, practice it on every crossing, regardless of depth.
Disconnect the engine fan (if belt-driven): Mechanical fans push water back onto the engine at speed. Most modern vehicles run electric fans, where this is not a concern. However, if you have a belt-driven fan, the blades hitting the water surface throw it directly into the engine bay.
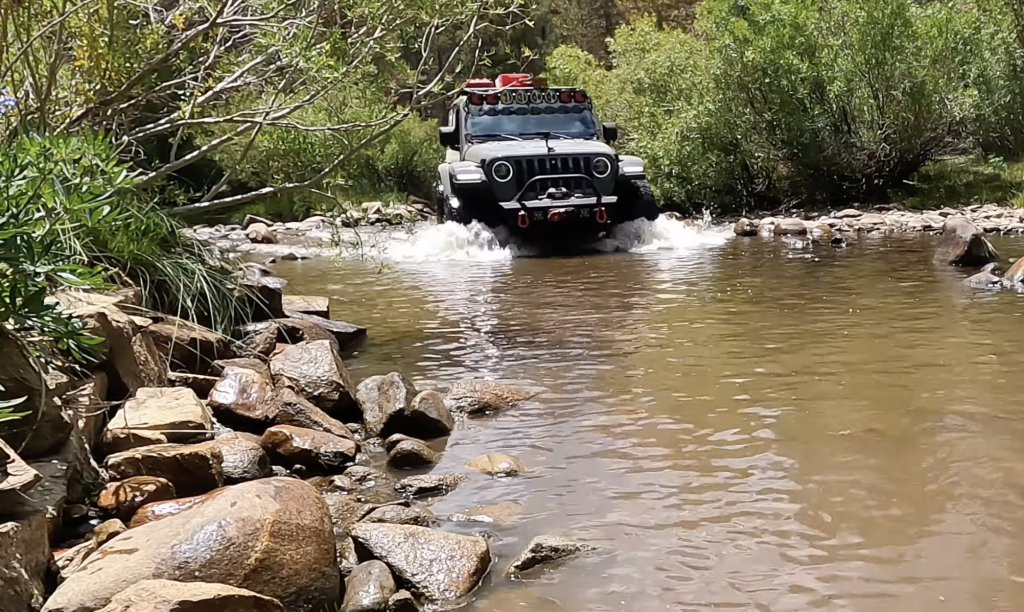
Driving Technique: The Bow Wave Method
The bow wave method is the single most important 4WD water crossing technique. When you enter the water at a slow, steady speed (3-5 mph), your vehicle’s front bumper pushes a wave of water ahead and to the sides. This bow wave creates a trough of lower water directly behind it, around the engine bay. As a result, the effective water level around your air intake drops several inches below the surrounding surface (experienced off-roaders commonly report 4-6 inches of reduction, though conditions vary with vehicle shape and speed).
Maintaining the bow wave requires consistent speed. Speeding up collapses the wave behind the vehicle, and water surges back into the engine bay. Conversely, slowing down or stopping, the wave dies and water settles at full depth around the vehicle. The sweet spot is 3-5 mph in 4-Low, 2nd gear. This speed generates a visible wave pushing ahead of the bumper while keeping splashing minimal.
Also, steer a straight line through the crossing. Turning the front wheels creates a gap in the bow wave on the inside of the turn, allowing water to rush into the engine bay. If you need to adjust direction, make corrections gradually. Also, pick your exit point before entering and drive toward it without hesitation. Stopping mid-stream eliminates the bow wave and lets water reach full depth against your vehicle.
Hydro-Lock Prevention: Protecting Your Engine
Hydro-lock prevention is the primary goal of every fording decision you make. This catastrophic failure occurs when water enters the engine’s combustion chambers through the air intake. Because water does not compress like air, the pistons slam into an incompressible barrier. The result: bent connecting rods, cracked cylinder heads, and in severe cases, a destroyed engine block. Repair costs range from $3,000 for rod replacement to $8,000+ for a complete engine.
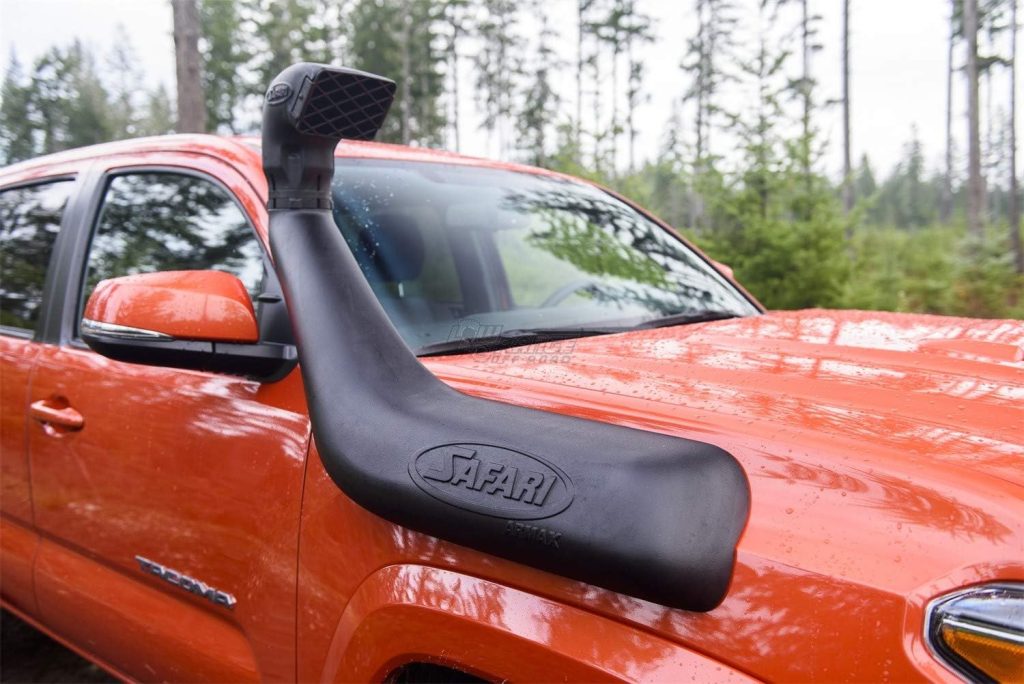
Because of this, your air intake height is the critical factor. The Gladiator Rubicon’s stock air intake sits at roughly 30 inches above ground level. Meanwhile, the ZR2’s intake is lower (approximately 20 inches). A snorkel relocates the intake to roof level, raising the safe depth to 40+ inches. However, a snorkel without sealed differential breathers still risks water contamination in the axle housings.
For hydro-lock prevention without a snorkel, follow these rules: never exceed your vehicle’s published fording depth, always maintain the bow wave, never cross moving water above your bumper line, and if you stall mid-crossing, do not restart the engine. Because cranking a hydro-locked engine causes the damage. Instead, tow the vehicle out, remove the spark plugs, and crank the engine to expel water from the cylinders before attempting a restart.
Snorkels Worth Considering
| Snorkel | Price Check |
|---|---|
| ARB Safari Snorkel Air Intake | Check Amazon Price |
| Anbull Snorkel Kit | Check Amazon Price |
| LEDIN Heavy Duty Snorkel Kit | Check Amazon Price |
| AEV Snorkel Kit | Check Amazon Price |
| Mishimoto Borne Off-Road Snorkel | Check Amazon Price |
Stuck Mid-Crossing: What to Do
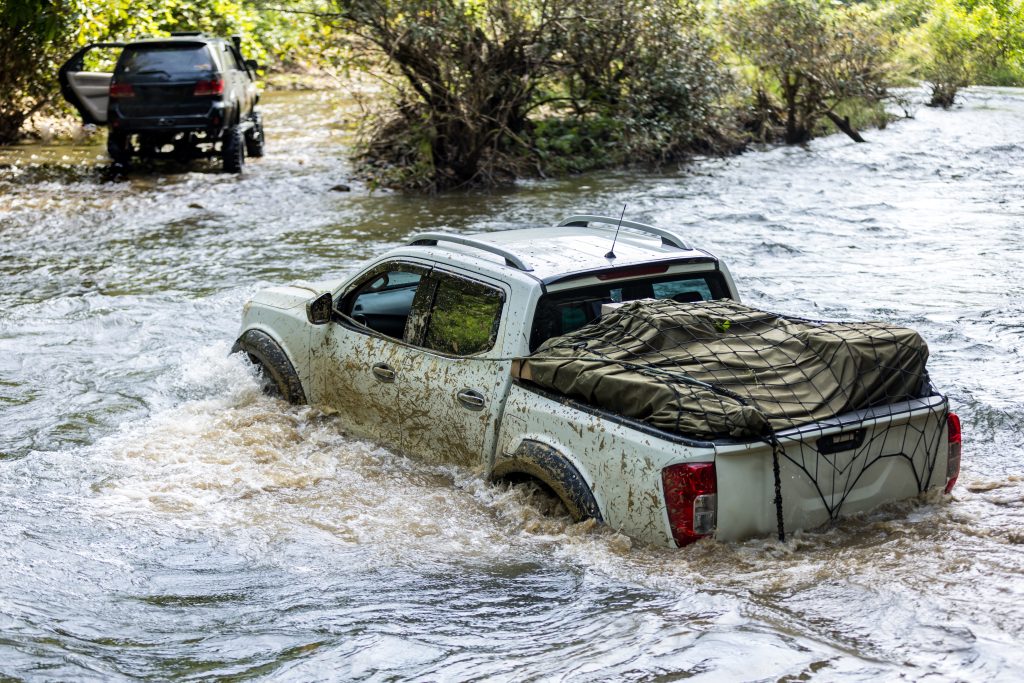
Getting stuck mid-stream during an off-road water crossing requires fast, calm decision-making. The longer your vehicle sits in water, the more it seeps into differentials, the transfer case, wheel bearings, and electrical connectors.
First, do not panic-rev the engine. Because spinning tires dig you deeper into the river bottom and throw water higher into the engine bay. Instead, try gently rocking between drive and reverse at idle speed. When the vehicle moves backward at all, reverse out along your entry tracks.
Should rocking fail, call for a tow immediately. Attach a kinetic recovery rope or winch line to a rated recovery point. The tow vehicle should pull from the bank, not from inside the water. For proper recovery technique and strap attachment methods, see our walkthrough. Meanwhile, keep the engine running at idle to maintain exhaust pressure (exhaust gas prevents water from flowing up the tailpipe). If the engine stalls, do not restart it until you confirm no water entered the intake.
Featured on MORRFlate
Your Post-Crossing Checklist Starts with Tire Pressure. Get It Right with One Tool.
After every water crossing, reinflate to trail pressure before continuing. The MORRFlate TenSix gets all four tires back to your target PSI in minutes.
Post-Crossing Maintenance Checklist
Post-crossing maintenance starts the moment you reach dry ground. Notably, some tasks need immediate attention; others you handle in the garage within 24-48 hours. Skipping these steps leads to corrosion, seal failure, and premature bearing wear.
Immediately After Crossing
First, ride your brakes lightly for 100-200 feet. Water saturates the brake pads and rotors, reducing stopping power by up to 80%. Gentle braking generates heat through friction, which evaporates the water and restores full braking performance. Also, check your air filter for moisture. If the filter is wet, stop driving immediately. A wet filter restricts airflow and risks pulling water droplets into the intake manifold.
Within 24-48 Hours
Check differential fluid in both axles and the transfer case. Pull the fill plug and inspect the fluid. Normally, healthy gear oil is amber or dark brown. Milky, gray, or chocolate-colored fluid indicates water contamination. If contaminated, drain and replace the fluid immediately. Additionally, leaving water-contaminated gear oil in the housing for more than a few days accelerates bearing wear and gear corrosion.
Inspect all electrical connectors below the waterline. Look for green corrosion on copper terminals. Spray dielectric grease on any connectors showing moisture intrusion. Also check the fuse box for water pooling and dry it thoroughly. Finally, grease all suspension joints, U-joints, and wheel bearing seals with fresh waterproof grease. Water washes existing grease out of these fittings during crossings.
Pros and Cons of Water Crossings in a 4WD
After years of trail driving in Colorado and California, here is an honest assessment of water crossings as an off-road activity:
Pros
- Opens access to trails and remote areas separated by creeks, rivers, and washes
- Teaches precision vehicle control and judgment skills transferable to all off-road driving
- Stock 4WD vehicles handle most trail crossings without modification (under 20 inches)
- Cools undercarriage components on hot days (brakes, differential housings, transfer case)
- Often unavoidable on backcountry routes; mastering the technique is essential, not optional
Cons
- Highest damage potential of any off-road obstacle. A single hydro-lock event costs $3,000-$8,000 in engine repairs.
- Requires service after every ford (differential fluid check, brake drying, electrical inspection)
- Water hides the bottom: depth, holes, and obstacles are invisible until you hit them
- Moving water generates lateral forces strong enough to push a truck off its line at 6+ mph current
- Repeated crossings accelerate bearing wear, seal degradation, and undercarriage corrosion even with proper care
Final Verdict
A water crossing is the one off-road obstacle where preparation matters more than driving skill. You handle most trail crossings safely by following three rules: walk the crossing first, stay well below your vehicle’s fording depth, and maintain a steady bow wave at 3-5 mph in 4-Low. These 4WD water crossing techniques work across all vehicles and water conditions.
The Gladiator Rubicon’s 30-inch factory fording depth and sealed axle design make it well-suited for moderate crossings. Meanwhile, the Colorado ZR2 handles shallower fords (under 16 inches in practice) with confidence, though its lower air intake limits deeper water. Both vehicles benefit from the same service routine: dry the brakes, check differential fluid, inspect electrical connectors, and re-grease suspension fittings.
For anyone building a vehicle for regular water crossing use, prioritize these modifications in order: extended differential breathers ($50-$150), a cold air intake relocation or snorkel ($400-$800), and waterproof electrical connectors ($100-$200). The total cost of these upgrades is less than a single hydro-lock repair. Carry proper recovery gear including a kinetic rope and rated recovery points for every crossing.
Frequently Asked Questions
Do I need a snorkel to cross water in my 4WD?
Not for crossings below your vehicle’s factory water fording depth. The Gladiator Rubicon handles 30 inches without a snorkel. Instead, the key is staying well below the published limit and maintaining a steady bow wave. However, if you regularly cross water above 24 inches or in moving current, a snorkel ($400-$800 installed) eliminates the hydro-lock risk and is worth the investment.
Should I use 4-High or 4-Low for water crossings?
Use 4-Low for nearly all water crossings. On any off-road water crossing, low range provides maximum torque at the 3-5 mph crawl speed needed for a proper bow wave. Select 2nd gear in 4L for the ideal balance of speed and control. Switch to 4-High only for shallow crossings (under 6 inches) on firm bottoms where stopping is unlikely.
What should I do if my vehicle stalls mid-crossing?
Do not restart the engine. Cranking a hydro-locked engine causes catastrophic internal damage (bent rods, cracked heads). Instead, call for a tow out of the water. Once on dry ground, remove the spark plugs and crank the engine briefly to expel any water from the cylinders. Inspect the air filter and intake tract for moisture before attempting a restart.
How do I check for water damage after a crossing?
Start with differential fluid. Pull the fill plugs on both axles and the transfer case. Milky or gray fluid means water contamination; drain and replace immediately. Then check your air filter for moisture, inspect electrical connectors below the waterline for green corrosion, test your brakes for reduced stopping power, and listen for new noises from wheel bearings. Thorough post-fording service takes 30-60 minutes.
Do I need to change differential fluid after every crossing?
Only if the fluid shows contamination (milky, gray, or chocolate color). If your differential breathers are sealed and extended above the waterline, clean crossings below fording depth rarely contaminate the fluid. However, check the fluid after every crossing deeper than 12 inches as a precaution. A differential fluid change costs $50-$100 and takes 20 minutes; ignoring contamination costs $500-$1,000 in bearing and gear damage.
How does tire pressure affect water crossing traction?
Lower tire pressure (20-25 PSI) increases the contact patch on slippery river bottoms, improving grip on rocks, gravel, and mud. Additionally, softer tires conform to submerged obstacles rather than bouncing off them. After the crossing, reinflate to your normal trail pressure before continuing. Air down for the crossing, air up after. The MORRFlate TenSix handles this in minutes.