


Quick Verdict: After two months across Big Bear, Thomas hunting grounds, and dispersed California camps, this Flagpole Buddy Starlink review lands on a clear recommendation for mobile users who need line of sight above obstructions. The $230.99 hitch kit deploys from ground level in under five minutes, includes adapters for Gen 2, Gen 3, or Mini, and raises the dish roughly 13 feet above the receiver. Moreover, owners report the pole holding through sustained winds above 50 mph. The main trade-off is price against DIY alternatives. However, field testing confirmed the aluminum sections remained stable and the hitch clamp held without rattle.
Last updated: April 2026 | 8 min read
This review contains affiliate links. All opinions are based on two months of personal field testing.
In This Review
- Flagpole Buddy Starlink Review: Who This Is For
- Key Specs at a Glance
- Setup and Deployment
- Two Months of Field Testing in California
- Line of Sight and Elevation Gains
- Build Quality and Component Details
- Wind Performance: What Owners Report
- Flagpole Buddy vs Ladder Mounts and DIY Options
- Pros and Cons
- Flagpole Buddy Starlink Review: Final Verdict
- Frequently Asked Questions
Flagpole Buddy Starlink Review: Who This Is For
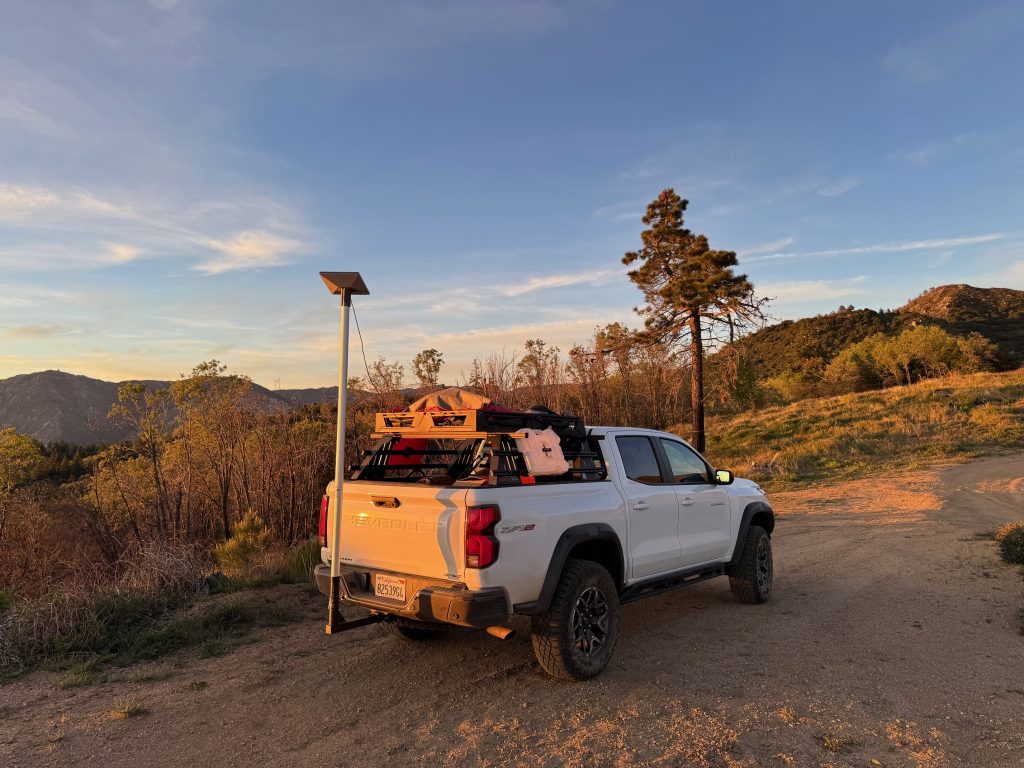
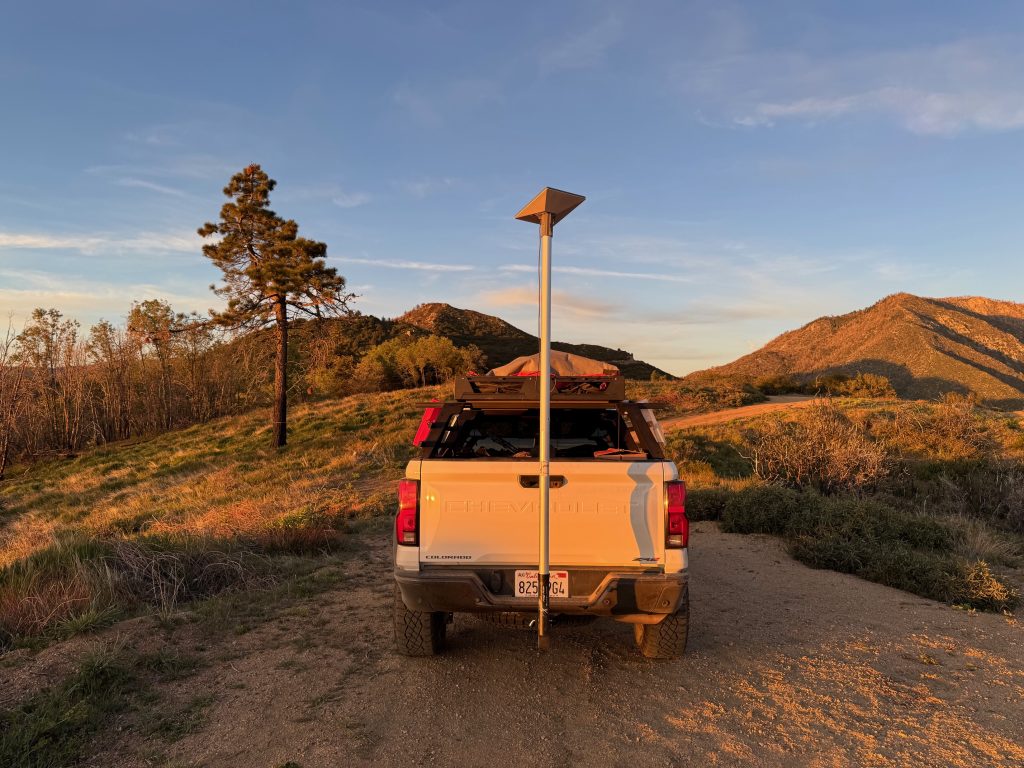
This Flagpole Buddy Starlink review focuses on the 2026 Hitch Mount Kit, a three part aluminum pole Starlink mount system, designed to raise the dish roughly 13 feet above a 2-inch receiver hitch. For those that need a little more height, another 4′ pole can be purchased and used without compromising rigidity. The kit suits overlanders, off-roaders, hunters, and RVers who park in wooded areas, low valleys, or crowded camps where a ground-level dish loses obstruction checks and drops speeds.
Before ordering, you select an adapter for Gen 2, Gen 3, or Starlink Mini. Because Starlink hardware varies in mounting interface, matching the correct adapter at checkout matters. For example, Gen 3 owners on the Starlink Group Facebook forum reported needing a supplementary pipe adapter when pairing the dish with incompatible hardware, so picking correctly at the cart stage prevents a second $38 purchase.
At $230.99, the kit sits between DIY PVC builds ($30 to $60) and commercial articulating arms ($350 and up). The kit includes the hitch mount, three 4-foot aluminum pole sections, cable clamps, a hitch clamp to eliminate receiver slop, a pole locking knob, a carrying bag, and a 5/8-inch hitch pin. Consequently, unlike DIY routes, nothing else is needed after unboxing.
For a 4×4 or overland rig without a rear ladder, the hitch kit removes the two alternative approaches most owners reject: drilling into the body for a ladder mount, or sticking suction cups on painted fiberglass. Therefore, the hitch version has become the default recommendation on iRV2, Reddit r/RVLiving, and the Starlink RV Facebook group as a Starlink mount for overlanding rigs and coaches without factory ladders.
Key Specs at a Glance
| Specification | Details |
|---|---|
| Price (2026 kit) | $230.99 |
| Dish compatibility | Gen 2, Gen 3, or Starlink Mini (select at checkout) |
| Receiver fitment | 2-inch receiver, 5/8-inch hitch pin included |
| Pole material | Aluminum, three 4-foot sections, up to 2.0-inch diameter |
| Mount construction | One-piece alloy steel, black powder coat |
| Mount dimensions | 22 x 18 x 4 inches (per Amazon listing) |
| Extended pole height | Approximately 13 feet above hitch receiver |
| Included accessories | Hitch clamp with hand knobs, 3 cable clamps, pole locking knob, large carrying bag |
| Compatible larger poles | Works with 16-foot or 22-foot Xtreme poles sold separately |
Featured on Flagpole Buddy
Get Your Starlink Above the Tree Line
The 2026 hitch kit ships with adapters for Gen 2, Gen 3, or Mini and drops into any 2-inch receiver in minutes.
Setup and Deployment
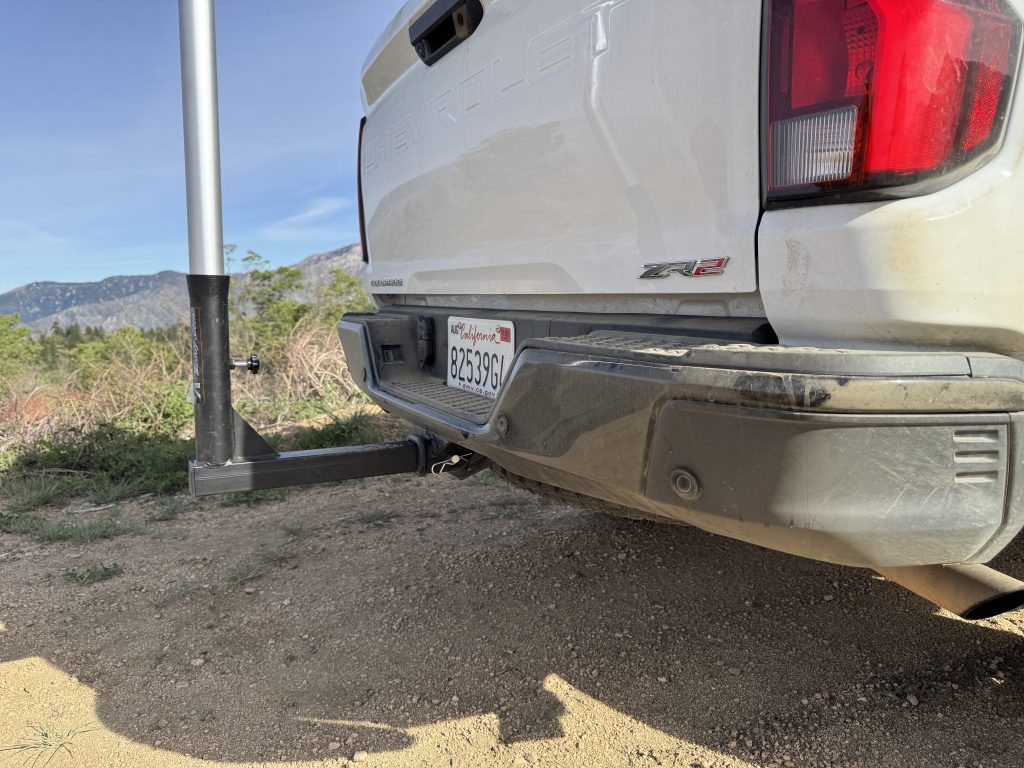
Setup starts at the receiver. First, the hitch mount slides into a 2-inch receiver and secures with the included 5/8-inch pin. Next, the hand-knob clamp locks down against the top of the receiver tube. Because the clamp compresses the mount against the receiver walls, it eliminates the slop and rattle common on plain-pin installations.
Then the three aluminum pole sections snap together. Each section runs roughly 4 feet. After seating the sections, the top receives the Gen 2, Gen 3, or Mini adapter, and the Starlink dish threads onto the adapter. Finally, the cable clamps secure the Starlink cable along the pole so wind motion does not yank the connector.
Ground-Level Deployment in Under 5 Minutes
Field deployment at camp follows a short sequence. First, drop the mount into the receiver. Second, join the pole sections on the ground with the dish pre-attached. Third, lift the assembly vertically into the mount and tighten the pole locking knob. As a result, full deployment finishes in about 4 to 5 minutes solo, and breakdown runs the same.
Ground-level workflow matters for users without ladders. A Grand Design owner on mygrandrv.com summarized the appeal: Flagpole Buddy, everything done from the ground. In practice, skipping roof or ladder work reduces injury risk and setup time in wet, dusty, or cold conditions.
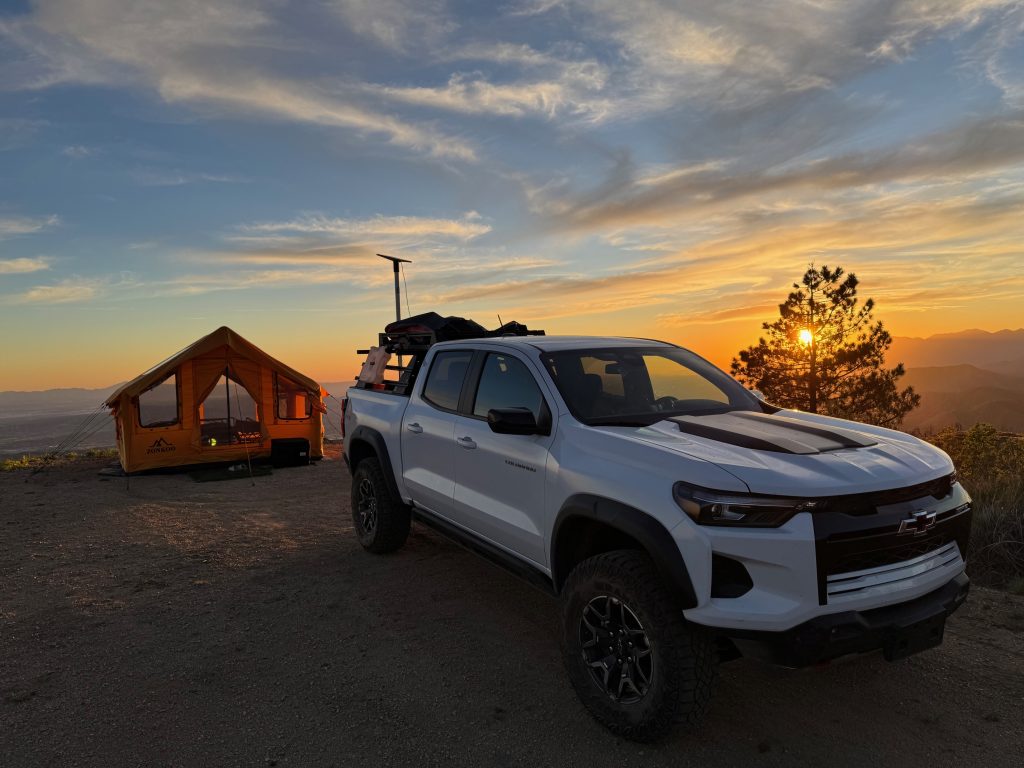
Two Months of Field Testing in California
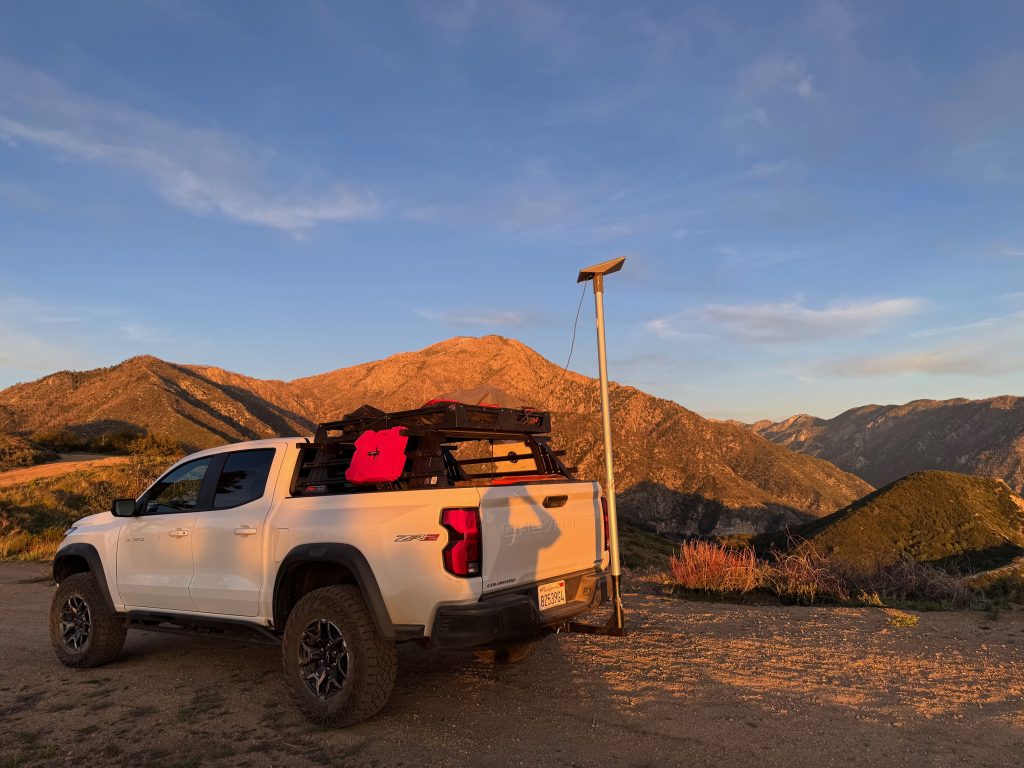
Field testing covered mountain elevation at Big Bear, hunting trips at the Thomas hunting grounds, and several dispersed California camps. Across every location, the priority stayed the same: put the Starlink dish above tree canopies, trailer sidewalls, and human traffic so the obstruction map stays clean and speeds hold up.
Big Bear sits around 6,750 feet with dense pine canopy surrounding most dispersed sites. Specifically, a ground-level dish in this environment loses multiple seconds of visibility per hour to branches, which shows as degraded latency and dropped calls in the Starlink app. However, with the pole extended above the lower canopy, obstruction percentage dropped noticeably and Zoom calls held without freeze.
At the Thomas hunting grounds, dispersed camping meant no power pedestals and no marked sites. Consequently, the hitch mount served as a standalone anchor independent of trees, boulders, or body panels. On one afternoon with gusts in the 20 to 25 mph range, the pole flexed a few inches at the tip but returned to vertical without base movement. Notably, the hitch clamp held the base solid through the trip.
Across California dispersed camps, one practical benefit stood out. When kids, dogs, and other campers moved through the site, the elevated dish sat well above head height. As a result, no one tripped over a ground stand or a cable run. For family overlanding, this single benefit alone justified a chunk of the price.
Line of Sight and Elevation Gains
Testing at Big Bear told the story fastest. With the dish on the ground behind the rig, the Starlink app obstruction map flagged persistent blockage from surrounding pine canopy, and video calls froze every few minutes. After raising the dish on the full three-section pole, the obstructed cone shrank to a narrow slice and calls stayed stable through hour-long sessions. The change was obvious on the same site, same evening, no other variable shifted.
Starlink performance depends on line of sight to low-earth-orbit satellites. Any obstruction in the 100-degree cone above the dish reduces throughput because fewer satellite handoffs complete per orbital window. At roughly 13 feet of pole height, the dish sits above most pickup cabs, teardrop trailers, and lower pine branches. Still, taller obstacles remain a consideration. For camps under redwoods or tight oak groves, even 13 feet might not clear the canopy, so site selection stays part of the equation.
One practical tip emerged during testing: run the Starlink app obstruction test before committing to a site. Because the Flagpole Buddy Starlink pole mount deploys so quickly, relocating the dish 10 to 15 feet often clears a partial obstruction without moving the rig. Rotating the mount 90 degrees in the receiver, or walking the assembly to a gap in the canopy, takes under 60 seconds.
Build Quality and Component Details
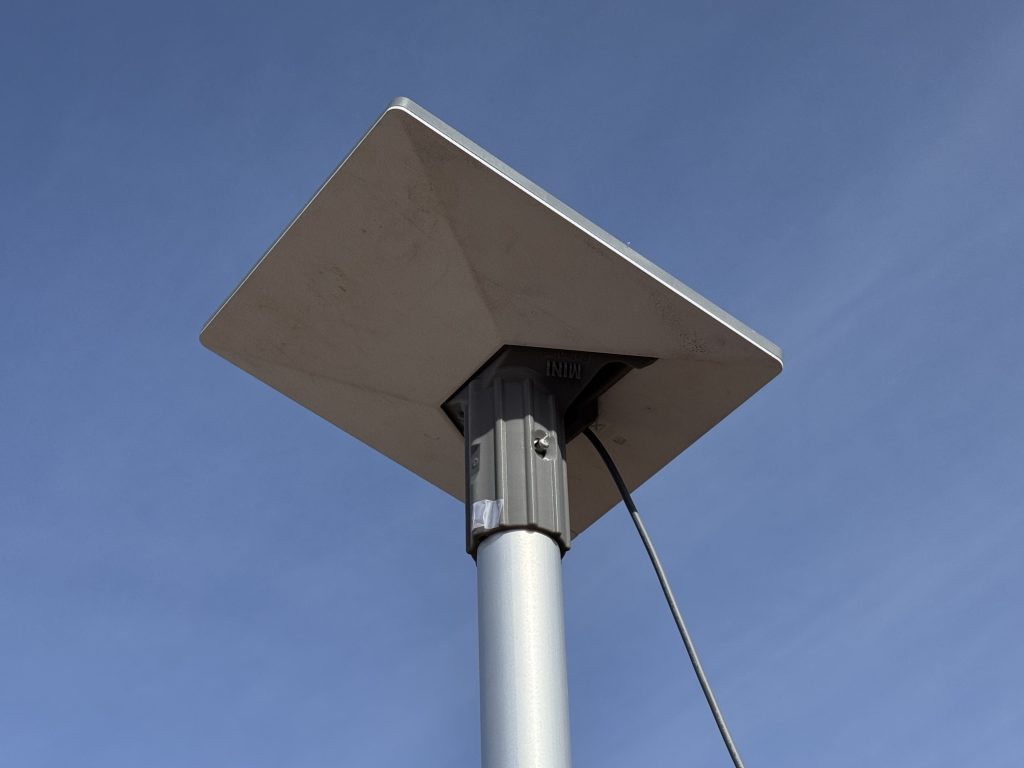
The hitch mount itself is one-piece alloy steel with a black powder coat, which handled stone chips and winter road spray without flaking after two months. Additionally, the hand-knob hitch clamp threads are steel, not plastic, and the clamp pad makes full contact with the receiver tube. Consequently, this Flagpole Buddy Starlink review found no rattle at highway speeds when the mount stayed installed for transit with the pole removed.
Aluminum pole sections measure roughly 2 inches in outer diameter. According to the product page, hardware uses stainless steel, and the plastic components use fiberglass-filled nylon. Because stainless and fiberglass nylon both tolerate UV and temperature swings well, the kit should hold up better than plain steel or ABS alternatives across multi-season use.
One practical note: the sections snap together with internal locking tabs. When the pole stays extended for days in wind, check the joints periodically for loosening. On one trip, a lower section backed off a quarter-turn after 36 hours of intermittent gusts, though re-seating took five seconds with no tools.
Featured on Flagpole Buddy
Pick Your Gen 2, Gen 3, or Mini Kit
One checkout, correct adapter, no second order for pipe sleeves or clamps.
Wind Performance: What Owners Report
Wind is the first question most buyers ask about any pole-mounted dish. Field testing in California only reached sustained gusts in the mid-20 mph range during this window. However, forum data from long-term owners fills the gap for higher-wind scenarios.
A Starlink RV Facebook group member camping near Moab, Utah reported the Flagpole Buddy setup holding through sustained overnight winds at 70 mph without damage. Similarly, a Reddit r/Starlink user noted the Gen 2 Flagpole Buddy ladder version came through 50-plus mph winds intact. An Oliver Travel Trailers forum owner also reported no issues with gusts while running the kit as a generic Starlink pole mount. That said, trust your gut on when to drop the pole. Your rig, your call.
Owners at higher wind speeds share one consistent practice: retract the pole if forecasts call for prolonged gusts above 40 mph. Because leverage grows with pole length, a shorter deployment reduces bending load on the aluminum sections and the hitch base. For overnight camps with forecasted wind, dropping to two pole sections instead of three cuts pole height from 13 feet to roughly 9 feet while still clearing most obstructions.
A separate point from a 2024 iRV2 thread is worth knowing: side-mount and ladder-mount users reported meaningful pole flex when the pole extends fully in wind. The hitch mount sidesteps the side-body leverage issue because the base sits centered over the hitch centerline and the load path runs through the receiver into the frame.
Need More Height
Pair With a 16 or 22-Foot Xtreme Pole
For camps under tall canopy, Flagpole Buddy offers separate Xtreme poles compatible with the hitch mount base.
Flagpole Buddy vs Ladder Mounts and DIY Options
Three main alternatives compete with the hitch kit: Flagpole Buddy’s ladder-mount version, harbor-freight-style telescoping flagpoles on DIY hitch brackets, and commercial fixed pole mounts from vendors like Uncommon Flagpoles. Each option trades off price, portability, and install effort.
The ladder-mount version runs about $81 to $150 depending on seller. However, it requires a factory rear ladder on the rig. For 4×4 trucks, overland rigs, and ladderless motorhomes, the ladder kit does not apply. Therefore, the hitch kit becomes the correct Starlink hitch mount path.
DIY Harbor Freight builds run about $50 to $80 in parts. Specifically, owners pair a 20-foot telescoping flagpole with a welded or bolted hitch receiver adapter. While savings matter, most DIY builds lack a proper hitch clamp, so they introduce rattle at highway speed, and they skip the Starlink-specific dish adapter. Consequently, DIY works for flag duty but needs add-on parts for reliable mounting.
Fixed aluminum flagpoles from vendors like Uncommon Flagpoles run $200 to $300 with a sturdier single-tube design. Still, the fixed pole does not break down for travel. For an overland rig with limited storage, the Flagpole Buddy sectional design packs into the included carrying bag and fits behind a rear seat or in a bed cubby.
Pros and Cons
Pros
- Ground-level deployment finishes in 4 to 5 minutes solo with no ladder work.
- Adapters for Gen 2, Gen 3, and Starlink Mini ship with the $230.99 kit.
- Hitch clamp eliminates receiver slop, stopping highway rattle during transit.
- Owners report surviving 50 to 70 mph winds at full deployed height.
- Three 4-foot aluminum sections pack into the included carrying bag.
- Raises the dish roughly 13 feet, clearing most canopies and trailer sidewalls.
- Stainless hardware and fiberglass-filled nylon handle sun and temperature swings.
- Works as a Starlink mount for overlanding trucks, trailers, and ladderless coaches.
Cons
- Site canopy above 13 feet still requires moving the rig or walking the pole.
- Hitch receiver is occupied while deployed, blocking tow-bar use.
- Full retraction is recommended in forecasted winds above 40 mph.
Flagpole Buddy Starlink Review: Final Verdict
This Flagpole Buddy Starlink review closes with a recommendation for overlanders, hunters, and RVers whose rigs lack a rear ladder and whose camping patterns include tree cover, mixed-elevation sites, or crowded ground traffic. The hitch kit solves the biggest Starlink problem in backcountry use: line of sight. At $230.99, the kit is not cheap, but it ships ready to go, breaks down into a bag, and holds up in real weather.
For ladder-equipped Class A and fifth-wheel owners, the ladder-mount version of the same system saves about $80 and delivers similar elevation. Therefore, if the rig has a solid rear ladder and plans do not include mounting on a truck or trailer hitch later, start with the ladder kit instead.
For DIY-inclined owners with welding skills, a Harbor Freight pole on a custom hitch bracket will match the function at lower cost. However, adding a proper hitch clamp and a Starlink-specific dish adapter often approaches half the cost of the factory kit while adding weeks of assembly. For time-poor buyers, the ready-made option pays back quickly.
Across two months of testing in California, the hitch kit earned its place in the rig. For buyers seeking a lighter Starlink mount for overlanding, the Flagpole Buddy Mini-specific kit paired with a Starlink Mini delivers a smaller, more portable setup at a similar price.
Ready to Buy
Order the 2026 Hitch Kit Direct
Gen 2, Gen 3, or Mini adapter selectable. Ships in a carrying bag with everything needed for ground-level deployment.
Frequently Asked Questions
Does the Flagpole Buddy hitch mount fit a 2-inch receiver?
Yes. The Starlink hitch mount fits any standard 2-inch receiver and ships with the 5/8-inch pin needed for insertion. Additionally, the included hand-knob clamp compresses the mount against the receiver, which stops the typical rattle of pin-only installations at highway speed.
How high does the Flagpole Buddy Starlink pole reach?
Extended fully, the three 4-foot aluminum sections lift the dish roughly 13 feet above the receiver. For camps under low tree cover, using two sections instead of three drops the height to about 9 feet while still clearing pickup cabs and teardrop trailers. As a result, most obstruction maps clear by relocating the pole instead of the rig.
Does Flagpole Buddy work with Starlink Gen 3?
Yes, provided you select the Gen 3 adapter at checkout. However, some Gen 3 owners on the Starlink Group Facebook forum reported needing an extra $38 pipe adapter when pairing with incompatible hardware, so confirming the Gen 3 adapter is in the cart avoids a second order. Gen 2 and Starlink Mini adapters are available at the same price.
Is the Flagpole Buddy hitch mount stable in high winds?
Owner reports on Facebook, Reddit, and the Montana Owners forum show the setup surviving sustained winds of 50 to 70 mph without damage. Still, retracting to two sections is advised when forecasts exceed 40 mph because leverage on the aluminum poles grows with height. The hitch base itself stays solid because the load path runs through the receiver into the frame.
Does using the hitch mount block the tow bar?
Yes. While deployed, the hitch receiver is occupied, so towing is not an option during setup. For owners who flat-tow, the workflow is unhitch first, deploy the pole after arrival, then retract and remove before departure. This adds roughly 5 minutes at arrival and 5 minutes at departure.
How does this Flagpole Buddy Starlink review compare to DIY options?
DIY Harbor Freight builds run about $50 to $80 but lack the Starlink-specific dish adapter and the anti-rattle hitch clamp. Consequently, DIY paths work well for flags but require add-on parts for reliable use. For time-poor buyers, this Flagpole Buddy Starlink review verdict favors the ready-made kit. However, the Flagpole Buddy hitch mount ladder-mount version saves $80 for any rig with a factory rear ladder.