


The true overland setup cost surprises almost everyone who starts pricing a rig. For years I have tested overlanding setups throughout California and the West, and the spreadsheet always runs longer than the daydream. Some gear earns every dollar. However, other gear drains your budget and gets ripped out within a season. Therefore, knowing the difference saves you thousands.
Not that long ago, I sat down with the Big Slack Off Road team and walked through some of their products. I climbed on the fenders, opened every latch, and studied how they spent money where it counts. As a result, I started thinking harder about where overlanders should invest and where they waste cash. This guide draws on decades of trail time and a recent shop-floor look. By the end, you will know which line items deserve your money and which ones you should skip.
Quick Facts:
- Topic: Overland setup cost, where to spend and where to save
- Typical total (excludes vehicle): ~$5,000 budget to $40,000+ premium
- Biggest spend: Trailer, suspension, and tires
- Best place to save: Camp kitchen, storage, decorative lighting
- Never cut: Recovery gear, tires, and your sleep system
- Budget build: Ground tent, entry recovery kit, basic power (~$5,000-$12,000)
- Premium build: Trailer, rooftop tent, dual battery, full armor ($30,000+)
- Best for: New and upgrading overlanders deciding where money matters
8 min read
In This Guide
What an Overland Setup Cost Covers

Your overland setup cost covers far more than a tent and a fridge. In reality, it spans the vehicle build, sleeping, power, recovery, storage, and an optional trailer. Each category hides a wide price range. As a result, two similar-looking rigs at camp differ by twenty thousand dollars. Because of this spread, smart planning matters more than a big budget.
New overlanders often feel this the hard way. Plenty of first-time builders spend thousands before the rig ever sees a trail, and a big share funds overland gear swapped out within a season. For example, a shopper grabs a premium rooftop tent before owning a recovery kit. Then the truck gets stuck on its first trip, and the priorities flip overnight.
The fix is sequencing your money. First, build capability and safety. Next, add comfort once the foundation holds. To see the smartest buying order, our guide on which upgrades to buy first ranks every accessory by priority. With this order in mind, the cost breakdown below makes a lot more sense.
Overland Setup Cost Breakdown
Here is a realistic overland setup cost breakdown by category. First, budget figures assume smart, durable entry gear. Meanwhile, premium figures assume name-brand parts and shop installation. Use the ranges as a planning map, not a quote.
| Category | Budget | Premium |
|---|---|---|
| Recovery gear | $200-$600 | $1,500+ |
| All-terrain tires | $800-$1,400 | $1,600-$2,500 |
| Suspension and lift | $1,000-$2,000 | $2,500-$5,000 |
| Sleeping (tent or RTT) | $150-$1,000 | $2,500-$4,300 |
| Fridge or cooler | $60-$400 | $700-$1,500 |
| Power and solar | $300-$800 | $1,500-$3,000 |
| Lighting | $100-$300 | $700-$1,500 |
| Trailer (optional) | $5,000-$8,000 | $12,000-$40,000+ |
| Full build (excludes vehicle) | $5,000-$12,000 | $30,000-$40,000+ |
Buy Direct From Big Slack Off Road
See Where a Steel Trailer Fits Your Budget
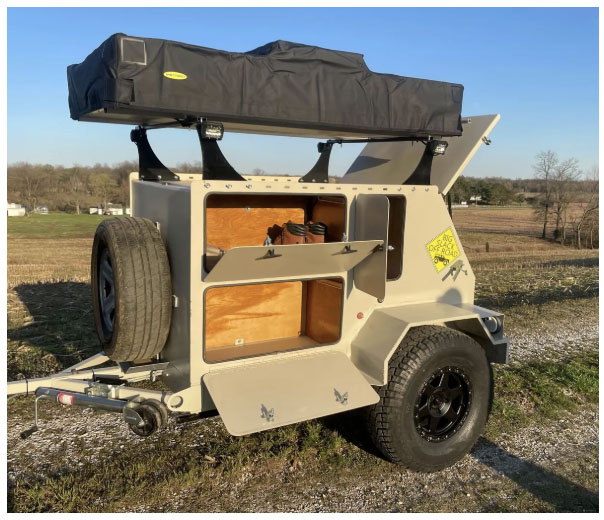
The Slacklander pairs a 6-inch channel steel frame with a braked 2,200 lb Timbren axle and a 1,000 lb payload. One purchase to carry your gear for decades.
Where to Spend: Gear Worth Your Money

Some categories of overland gear reward every dollar with reliability, safety, or years of service. Above all, these are the places to spend first and spend well. Cheap options here cost more later through failures, replacements, or worse.
Tires and Recovery Gear Come First
Recovery gear and tires keep you safe and moving, so they top the spend list. A quality recovery kit, traction boards, and a winch pull you out when a trail turns ugly. Notably, good all-terrain tires grip rock, mud, and sand while resisting punctures. For roughly two thousand dollars, tires, a modest lift, and rock sliders transform a stock rig. Therefore, fund this foundation before anything photogenic.
The Trailer: Spend Once, Tow for Years
A capable overland trailer is the biggest single line item for many builds, and it rewards the spend. Instead of overloading your roof and bed, a trailer carries water, fuel, kitchen, and sleeping off the truck. For example, standing with the Big Slack team, I saw why their steel Slacklander earns its price: a 6-inch channel frame, a braked 2,200 lb Timbren axle, and a 1,000 lb payload at 1,500 lb empty. Because a stout trailer lasts decades and holds resale, the cost spreads thin over years. For the full research process, read our overland trailer shopping guide.
Smart Places to Cut Spending
Other categories deliver the same trail experience at a fraction of the price. In particular, spending up here buys polish, not capability. Save in these areas, then redirect the cash toward the gear you keep.
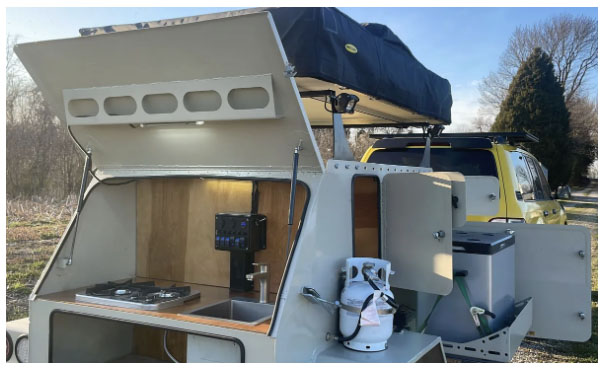
Camp Kitchen and Storage
A camp kitchen is the easiest place to save. For example, a plastic tote, a two-burner stove, and a water jug match a thousand-dollar slide-out for most trips. Likewise, storage rarely needs branded drawers. Stackable totes and cargo nets organize gear for a tenth of the price. Spend the savings on recovery essentials instead.
Sleeping and Lighting
Both categories tempt big spending, yet each offers a strong budget path. A solid rooftop tent under a thousand dollars sleeps as well as a four-thousand-dollar model on calm nights. Similarly, a basic LED bar and a few camp lights cover most needs, while premium pods mainly add lumens and longevity. Spend up here only if you camp hard in rough weather, where a tougher tent and brighter lighting start to pay off.
Save Where It Counts
Put Your Money Into a Trailer Built to Last
Skip the gimmicks and invest in the foundation. The steel Slacklander hauls water, fuel, and sleeping off your truck, trip after trip.
Never Cut Corners on These
A few categories punish cheapness with danger. Above all, recovery, tires, and your sleep system protect your safety and health on the trail. A failed strap, a blown budget tire, or a freezing night turns a trip into an emergency. Therefore, buy these to a standard matching your worst expected conditions, not your average ones.
Budget Build vs Premium Build: Which Should You Choose?

The right build depends on how often and how hard you travel. For instance, weekend trips on forest roads run fine on a budget overland setup near five to twelve thousand dollars. Conversely, full-time travel across brutal terrain justifies a premium build past thirty thousand. Most overlanders land somewhere between, and the middle works well.
Match spending to your real trips, not your fantasy ones. For example, our piece on overlanding with a trailer weighs how a trailer changes the math. Similarly, our roundup of off-road campers across price points shows the real spread. With these references in hand, sizing your budget gets easier.
Quality Trailer Pros
- Carries water, fuel, kitchen, and sleeping off your truck’s roof and bed
- A stout steel build lasts decades and holds resale value
- Field-repairable frame welds almost anywhere on the trail
- Frees roof load, which protects handling and suspension life
- One purchase replaces several roof-rack and storage upgrades
Quality Trailer Cons
- Highest single line item, often $12,000 to $40,000+
- Adds tow weight and length on tight trails
- Lead times run weeks to months on custom builds
- Overkill for occasional campers who travel light
Final Verdict
For most overlanders, the smart overland setup cost is not the smallest one. Therefore, spend confidently on recovery, tires, suspension, and a trailer if you tow. Those line items protect your safety and reward you for years.
Save without guilt on the camp kitchen, storage, decorative lighting, and a basic rooftop tent. Here, premium gear buys comfort and looks, not capability. Consequently, redirecting this money toward safety gear stretches your build further.
Value comes from sequencing, not from a fat wallet. Build capability first, add comfort second, and skip the gear you will replace. With this approach, a five-thousand-dollar rig out-camps a careless thirty-thousand-dollar one.
My recommendation: start with a budget funding safety and a sleep system, then grow into bigger pieces like a trailer. For a do-it-once trailer, a steel build like the Slacklander spreads its cost over decades of trips. If you rarely tow, instead pour your budget into tires, recovery boards, and a dependable tent.
Ready To Buy?
Check Today’s Price on the Slacklander
Configure your steel trailer direct with Big Slack Off Road. Lead time runs 8 to 10 weeks depending on options, so plan ahead for next season.
Frequently Asked Questions
How much does an overland setup cost?
An overland setup cost ranges from about five thousand dollars to well past forty thousand. Specifically, budget builds with a ground tent and an entry recovery kit land near the low end. Premium builds with a trailer, a quality tent, and full armor reach the top.
What overland gear is worth spending money on?
The overland gear worth real money keeps you safe or lasts for years. Specifically, recovery kits, quality tires, suspension, and a capable trailer top the list. Each one prevents failures, replacements, or danger on the trail.
Where should you save on an overland build?
Save on the camp kitchen, storage drawers, decorative lighting, and gadgets. For example, a tote and a two-burner stove cook as well as a pricey slide-out. Put the savings toward safety and durability instead.
Is an overland trailer worth the cost?
For overlanders who tow often, a quality overland trailer earns its cost. It moves weight off your truck, carries more gear, and lasts for decades. However, occasional campers who travel light usually do better skipping it.
What is the most expensive part of an overland setup?
The trailer and the vehicle build are usually the priciest parts. Specifically, a capable trailer alone runs from five thousand to over forty thousand dollars. Beyond those, suspension, tires, and a sleep system add the next big chunks.
How do you build an overland setup on a budget?
Start with safety and sleep, then add comfort over time. First, buy recovery essentials, solid tires, and a weatherproof place to sleep. Next, upgrade power, storage, and a trailer as your trips grow. Because you sequence the spend, every dollar builds real capability.
Our articles might have affiliate links and the occasional sponsored content, but don’t sweat it – if you buy something, we get a little kickback at no extra cost to you, and we only hype products we truly believe in!