


Arriving at a quiet trailhead, knowing you can turn a rough patch of dirt into a comfortable basecamp in minutes, is one of the best feelings in overlanding. The Iron Peak XTR-10 was designed so those minutes are spent making coffee instead of wrestling with gear. With thoughtful layout and robust systems, this trailer makes setup efficient while keeping the focus on the trip itself.
This step-by-step guide walks you through the full process of setting up camp with the Iron Peak XTR-10 so you can move from travel mode to camp mode with confidence. I wrote this after multiple nights in variable conditions, from bone-dry deserts to windy alpine meadows, and I include practical tips that have saved time and stress on real trips.
Whether you are new to towable off-road campers or just want to tighten your routine, these steps cover site selection, leveling, power, water and galley prep, interior comfort, safety checks, and a few troubleshooting tips. By the end, you will be able to get set up quickly and reliably with the Iron Peak XTR-10.
Choose and Position Your Campsite
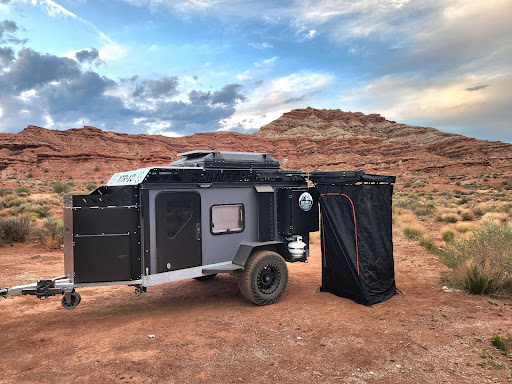
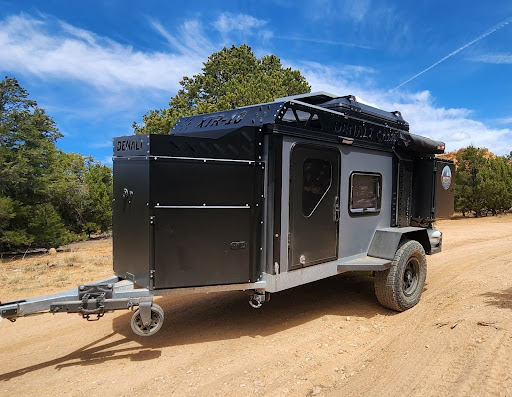
Picking the right spot first saves time on every following step. Look for reasonably level ground, avoid obvious drainage channels, and consider the sun angle for your solar exposure and shade. The Iron Peak XTR-10 is compact enough to fit tighter sites than many trailers, but you still want clearance for the roof rack and rear galley swing.
Think about wind direction and prevailing weather for the night. Positioning the rear galley toward shelter reduces wind cooking and makes meal prep more pleasant. If you plan to use the pivoting shower awning, allow room for it to open without hitting branches. I usually park so the refrigerator door faces the best view, while the galley faces wind protection.
Finally, consider vehicle approach and departure. You do not want to be forced into reversing on loose ground at night. When possible, drive in and park so you can leave the same way you came. That small choice reduces stress when packing up, especially after a soggy morning or when the sun is low and shadows hide obstacles.
Leveling, Unhitching, and Stabilizing the Iron Peak XTR-10

Once parked, focus on getting the trailer level. Proper leveling improves sleeping comfort, keeps the fridge door from swinging open, and ensures the sink and cooktop function correctly. Use the ARK XO corner steadies and the off-road tongue jack to raise or lower corners. Keep a set of plastic or aluminum leveling blocks in the vehicle; they speed the process and protect soft ground.
Unhitch carefully using the DO35 articulating coupler. Set the manual parking brake and chock the wheels before letting the tongue jack down. The articulating hitch helps when the ground is uneven because it maintains a secure connection during initial maneuvers and drops away cleanly when you need to unhitch. My tip is to keep a soft pad under the jack foot to avoid sinking on hot sand or mud.
With the trailer level and secured, deploy the corner steadies for stability. Tighten them only enough to remove sway; over-torquing can lift wheels and change the way the frame sits. If you camp on rocks or berms, a small cordless impact driver with the right socket will make adjustments faster than a hand crank. A stable platform is the foundation of a fast setup.
Powering Up the Iron Peak XTR-10

Access the front aluminum storage compartment where the Redarc power management system, EPOCH 300Ah lithium battery, and inverter are mounted. First, confirm the battery charge level and that the 30A charger is switched to tow-charge while you are still hitched if you want to top off during drive time. The Redarc monitors keep everything simple to read at a glance.
Next, decide whether you will run off battery and solar or continue drawing from the vehicle. The Iron Peak XTR-10 includes a roof-mounted 100-watt panel and a pre-wired Anderson plug for quick vehicle charging. For most short stays, the combination of the lithium battery and the inverter will cover lights, fans, and the fridge. If you plan to use the induction cooktop or run heavy loads, stagger usage or run shore charging.
Turn on the inverter and load the fridge, lights, and vent fans. Use the Redarc control unit to set charging priorities and monitor incoming solar. I recommend powering up the lights and the fan first to establish airflow and avoid condensation. Label switches in the storage compartment to help guests or friends who are less familiar with the system.
Deploying Awnings and Exterior Gear on the Iron Peak XTR-10

The 23Zero pivoting shower awning is quick to deploy and adds usable outdoor living space. Extend it on the sheltered side of camp for shade and privacy, and tie down the outer corners to avoid sail effect in the wind. The awning pivots intelligently so you can angle it toward the prevailing sun or block the wind, depending on conditions.
Use the MOLLE side racks for Rotopax, recovery boards, or tools you want accessible without opening the side storage boxes. The racks keep frequently used gear at hand and free up interior space. Mounting points on the roof rack allow you to add a rooftop load for bulky items and keep heavy cargo low, so handling is predictable when towing.
Exterior LED flood lights and underbody red rock LEDs make night tasks painless. When setting up at dusk, deploy lights before you start working on the galley or interior so your hands are free and you can see small fasteners. Secure any loose cargo on the rack and lock side boxes to keep tools dry and safe overnight.
Water System and Rear Galley Setup for the Iron Peak XTR-10

Access the 38-gallon fresh water tank and prime the self-priming pump. Check the water level gauge so you know how many days of use you have. The on-demand hot water system will run the sink and the outdoor shower, so run the pump briefly to purge air and verify steady flow before starting to cook.
Open the rear galley door and unfold the Partner Steel 22-inch cooktop with windscreens. The solid surface countertop and folding aluminum prep table give you a lot of functional workspace for the footprint. Position the 75-liter dual-zone fridge so its door can open fully without obstructing the prep area. Store frequently used pots and utensils in the top drawers for quick access.
When cooking, keep your water flow and propane checks part of the routine. Confirm the dual 11-pound propane tanks are secure and the regulator is seated correctly. I always keep a small bucket to capture drips and a dishpan to contain greasy water so the cabinet stays clean. Fold everything back and lock the galley when you are done for the night or when leaving camp.
Interior Cabin Prep and Climate Control in the Iron Peak XTR-10

Open the dual entry doors and slide the shades to ventilate. The MaxxFan Deluxe gives you strong extraction on warm nights, while the Truma VarioHeat propane heater provides precise warm-up on cold mornings. Because the cabin uses R9 insulation in walls, floor, and roof, the thermal mass keeps the interior stable and reduces the runtime needed on the heater or fan.
Make the tri-fold memory foam mattress and arrange bedding for the night. Set interior LED lights and plug in devices using the 12V, USB, and 120V outlets. The Redarc monitor lets you see power consumption so you can avoid surprises. If condensation is a risk, run the fan briefly during cool mornings to exchange humid interior air for drier outside air.
Use the acrylic windows and screens for cross-ventilation. For colder weather, set the heater to low and let the insulation do the heavy lifting. The cabin design minimizes thermal bridging, meaning you will notice fewer cold spots than in many other trailers. Small touches like a camp rug and breathable bedding improve comfort significantly.
Camp Comfort and Safety Checks for the Iron Peak XTR-10

Before settling in, do a quick walk around. Confirm the corner steadies are secure, the hitch is safe if still attached, and all exterior storage latches are closed. Check propane lines for leaks using soapy water and verify water pump pressure. A small headlamp makes this sweep faster and safer after dark.
Confirm battery and fridge voltages on the Redarc display and test lights and exterior LEDs. Stow tools away and secure heavy items so they do not shift overnight. If you have pets or small kids, create a staging area for gear that keeps them out of the way and prevents accidental tripping over open doors or jacks.
Finally, tie down the awning and exterior loose ends if wind is expected. Keep a tidy camp and a short list of emergency contacts and nearby roads. A simple emergency kit in the front aluminum compartment that includes a multi-tool, spare fuses, and a tire repair kit has paid dividends on more than one trip.
Enjoying Your Basecamp with the Iron Peak XTR-10

With everything set, you can focus on what brought you to the spot. The Iron Peak XTR-10 converts a trailhead into a livable, efficient basecamp that lets you spend more time on photography, fishing, hiking, or just relaxing. Use the rear galley and awning as your central living area and let the cabin serve as a clean, comfortable retreat.
Keep routines simple on multi-day stays. Refill water when convenient, rotate fridge settings to conserve power, and recharge the battery with the Anderson plug when you drive. Little practices like cooking bulk meals and using the folding prep table for food staging will save time and reduce cleanup.
When it is time to break camp, reverse the setup steps in an orderly way. Clean the galley, stow soft items, retract the awning, secure the roof rack, and confirm everything is locked. The Iron Peak XTR-10 rewards methodical packing with less fuss and fewer forgotten items.
FAQ
How do I level the Iron Peak XTR-10 on very uneven ground?
Use a combination of leveling blocks under the wheels and the ARK XO corner steadies. Start with the tongue jack to roughly level front to back, then add blocks under the lower wheel to achieve side-to-side level. Tighten the corner steadies to remove sway, but avoid lifting the wheels off the ground unless you are on solid levelers.
Can I run the fridge off the Iron Peak XTR-10 battery for multiple days?
Yes, for a few days, depending on usage and outside temperature. The 75-liter dual-zone fridge is efficient, and the EPOCH 300Ah lithium battery, combined with a roof solar panel, can sustain the fridge if you limit extra loads. Monitor power on the Redarc display and conserve energy by reducing interior lights and heater runtime.
What maintenance should I perform before a trip?
Check tire pressure and inspect for cuts, verify the hitch and safety chains, test the battery and charger, inspect propane connections, and exercise the water pump. Lubricate moving parts on the tongue jack and hinges, and confirm all lights are working. A short checklist run-through prevents most field issues.
Is the Iron Peak XTR-10 suitable for winter camping?
Yes. The insulated composite cabin with R9 walls, sealed windows, and a Truma heater makes it a capable four-season platform. Properly managing ventilation to avoid condensation and ensuring adequate propane and battery capacity are key for comfortable winter use.
What should I keep in a basic repair kit for the Iron Peak XTR-10?
Include spare fuses, tire repair plugs, a cordless impact driver with sockets, electrical tape, hose clamps, a multi-tool, and a small selection of spare fasteners. Add a compact air compressor and a recovery strap for remote trips.
Our articles might have affiliate links and the occasional sponsored content, but don’t sweat it – if you buy something, we get a little kickback at no extra cost to you, and we only hype products we truly believe in!